05 Aug

Part 8: Compiling our CNN
We now have our complete model and must make it ready to be run on the FPGA. To do this, we must compile our model with the Vitis AI compiler which will convert and optimise our model into a format that is runnable on the DPU. This tutorial will focus on the compilation process.
- Introduction
- Getting Started
- Transforming Kaggle Data and Convolutional Neural Networks (CNNs)
- Training our Neural Network
- Optimising our CNN
- Converting and Freezing our CNN
- Quantising our graph
- Compiling our CNN (current)
- Running our code on the DPU
- Conclusion: Improving Convolutional Neural Networks: The weaknesses of the MNIST based datasets and tips for improving poor datasets
- Conclusion Part 2: Sign Language Recognition: Hand Object detection using R-CNN and YOLO
The Sign Language MNIST Github
The Vitis AI compiler: VAI_C
The Vitis AI compiler or VAI_C works in a multi-stage process:
- The compiler parses the quantised CNN model and produces a computation graph consisting of a data flow and a control flow
- It will then optimise the data and control flow through processes such as fusing the batch normalization layers and exploiting data re-use
- Finally it generates the code to be run. The model will be split into kernels, some of which will be run on the DPU whilst others run on the CPU
We can run VAI_C through the following command:
BOARD=ZCU104
ARCH=/opt/vitis_ai/compiler/arch/dpuv2/${BOARD}/${BOARD}.json

vai_c_tensorflow \
--frozen_pb=./quantize/deploy_model.pb \
--arch=${ARCH} \
--output_dir=launchmodel \
--net_name=SignLanguageMNISTnet \
--options "{'mode':'normal'}"WARNING: arch/dpuv2/ZCU104/ZCU104.json is deprecated. Replacing with arch/DPUCZDX8G/ZCU104/arch.json
The –options parameter provides specific options for either edge or cloud flows of FPGAs. We can specify if we want our device to dump debug files or if we want to use a split IO memory model. Most of the time, the only thing we need to specify is if we want to run in ‘debug’ or ‘normal’ mode. In ‘debug’ mode, the nodes of the DPU are run one at a time so we can explore debugging or performance profiles of each node. In ‘normal’ mode the DPU runs without interruption and hence is the best for release models.
Once we run VAI_C, the compiler will produce a summary of the kernels it has deployed. In our case, the only node the DPU cannot run is the final softmax layer, so the compiler produces two kernels. One to run the majority of the model on the DPU and another to run the final softmax on the CPU:
[VAI_C][Warning] layer [activation_4_1_Softmax] (type: Softmax) is not supported in DPU, deploy it in CPU instead.

Kernel topology "SignLanguageMNISTnet_kernel_graph.jpg" for network "SignLanguageMNISTnet"
kernel list info for network "SignLanguageMNISTnet"
Kernel ID : Name
0 : SignLanguageMNISTnet_0
1 : SignLanguageMNISTnet_1

Kernel Name : SignLanguageMNISTnet_0
--------------------------------------------------------------------------------
Kernel Type : DPUKernel
Code Size : 0.01MB
Param Size : 1.56MB
Workload MACs : 10.02MOPS
IO Memory Space : 0.04MB
Mean Value : 0, 0, 0,
Total Tensor Count : 9
Boundary Input Tensor(s) (H*W*C)
input_1_1:0(0) : 28*28*1

Boundary Output Tensor(s) (H*W*C)
dense_2_1_MatMul:0(0) : 1*1*25

Total Node Count : 8
Input Node(s) (H*W*C)
conv2d_1_1_convolution(0) : 28*28*1

Output Node(s) (H*W*C)
dense_2_1_MatMul(0) : 1*1*25


Kernel Name : SignLanguageMNISTnet_1
--------------------------------------------------------------------------------
Kernel Type : CPUKernel
Boundary Input Tensor(s) (H*W*C)
activation_4_1_Softmax:0(0) : 1*1*25

Boundary Output Tensor(s) (H*W*C)
activation_4_1_Softmax:0(0) : 1*1*25

Input Node(s) (H*W*C)
activation_4_1_Softmax : 1*1*25

Output Node(s) (H*W*C)
activation_4_1_Softmax : 1*1*25
We can take a look at the kernel graph by converting the outputted .gv into a .png file:
dot -Tpng -o launchmodel/SignLanguageMNISTnet_kernel_graph.png launchmodel/SignLanguageMNISTnet_kernel_graph.gv
which should look like:
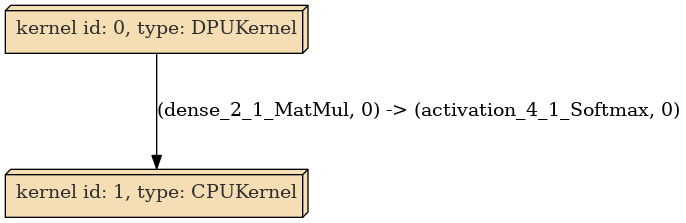
Each kernel summary will provide a summary of what nodes of our model are handled by that kernel. It will specify the boundary input and output tensors as well as the total node count in between the boundaries. It will also provide the size of the workload and memory usage. Specifics on all the information presented can be found here.
The model is then compiled into an .elf held in the launchmodel folder, which will contain all the information we need to run our model on our FPGA board. Next time we will take a look at running our kernel on the FPGA itself.

1 Comment
MTali
Which specific –option would one have to provide to compile for the split io memory model.