Continuous Integration (CI) as a software practise has seen mass adoption within the software engineering world. CI is a development practise that enables developers to regularly and automatically build, test and deploy their applications. Such a technology sounds great for Field Programmable Gate Arrays (FPGAs). In fact teams could get the following benefits from CI:
- Improved quality: CI enables automatic testing of FPGA designs, allowing for faster detection and correction of bugs and other issues, resulting in higher quality FPGA designs.
- Faster development: By automating the testing and deployment process, CI speeds up the development process and allows for quicker time to market.
- Better collaboration: With CI, multiple developers can work on a project simultaneously and have their changes automatically integrated and tested, improving collaboration and reducing the risk of conflicts.
- Increased efficiency: By automating the testing and deployment process, CI reduces the amount of manual effort required, freeing up time for more important tasks.
- Consistency: CI ensures that FPGA designs are built, tested, and deployed in a consistent manner, reducing the risk of inconsistencies and improving the overall quality of the final product.
Yet adoption has remained limited. Automating FPGAs is much a more difficult task than software. The software tools, we use such as Vivado are very large and demand a lot of computing resources. The development flow is completely different from standard software development flows and even connecting a FPGA to a server can be a challenge in itself.
In an industry, where time is limited and development is already cumbersome, many teams have already decided that the effort is not worth it. What if, however, we could lower these adoption barriers and gain the benefits without sinking huge engineering efforts into the upfront costs?
An overview of continuous integration for FPGAs
In this article, we will be providing a basic overview of what a Continuous Integration service for FPGAs looks like and the basic stages of setting it up.
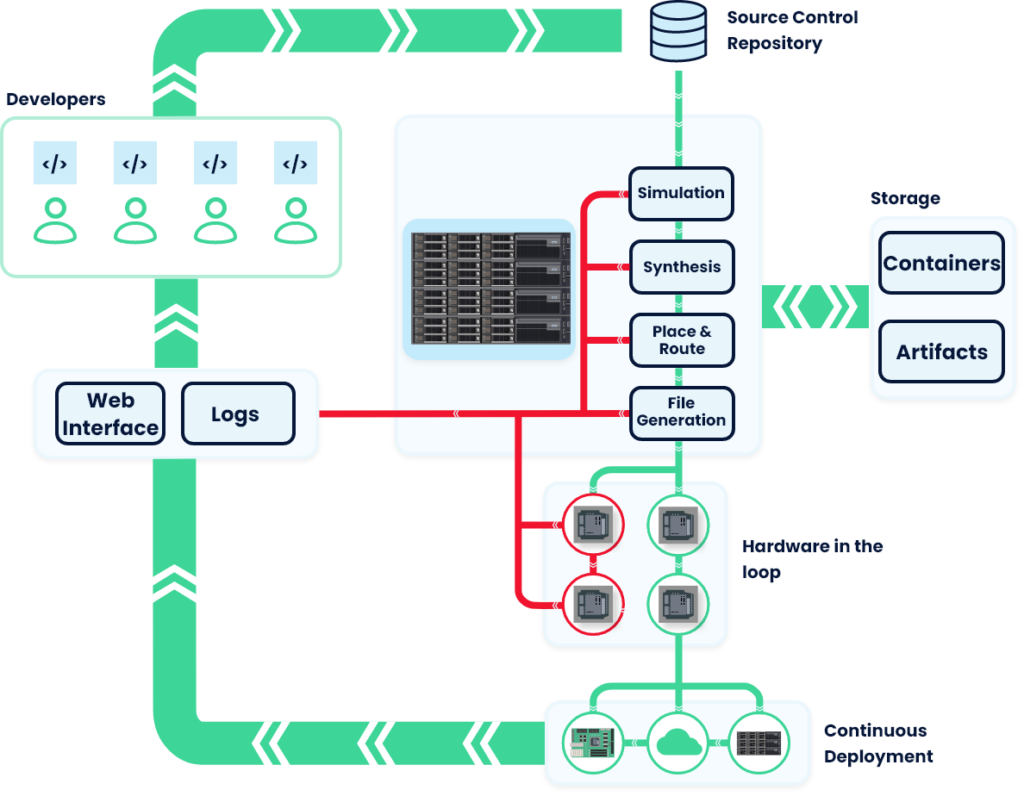
The above image shows a basic breakdown of the automated pipelines that most teams want to achieve when it comes to FPGA development.
It first begins by developers working on their specific sections of code. Each of them will work on a different area of the overall design, such as firmware, hardware design or verification testbenches.
Each developer will then regularly submit their code through to a Source Control Repository. Most used are Git-based, such as GitHub, GitLab or Bitbucket.
Every change to the code will trigger a pipeline to run. BeetleboxCI automates and orchestrates these pipelines. A typical pipeline will consist of three major stages: software flow, hardware in the loop (HIL) testing and continuous deployment.
Software flow
In the first stage, code is taken from the repository and runs through the various required software stages to produce the final files needed to configure the FPGA. These stages will typically run as jobs on a central server, which may be on premise or in the Cloud.
Typically, the first step in any FPGA development flow is to verify that our designs work through logic simulations, using tools like Vivado or ModelSim. To do this, BeetleboxCI will take the design and the tests from the repository and place them in a clean execution environment known as a Runner. A Runner is an isolated container that will have all the needed software tools and have dedicated computing resources to run the simulation job.
Once the simulation is finished, a pass or fail notification is sent to the Web interface as well as relevant logs. If a simulation fails, the team can then rapidly iterate on the code until it passes.
On simulations passing, the FPGA design is then synthesised, which converts the high-level descriptions into gates. The synthesised files are then saved into BeetleboxCI’s artifact store. The artifact store acts as a file storage area, which both developers and pipelines can easily access shared files. The synthesised file is then placed and routed onto the FPGA, where static timing analysis is performed to ensure that the designs will work properly. A pass/fail check can be performed at this point to check timing analysis as well as other properties. Crucially, whilst this all occurring automatically, developers are free to get on with future designs and do not need to spend their time monitoring the test process.
Finally, the software tool will generate the files that are needed to program the FPGAs. These files are then made available as artifacts in the artifact store. The team is then able to choose whether to test the generated files by manually configuring the FPGA or to automate further with HIL testing.
Hardware-in-the-loop (HIL) testing
Once we have the generated files, we then can perform HIL testing. Using BeetleboxCI, FPGA boards can be directly connected to a server, where they can be configured by the generated files. After configuration, more in depth tests can be performed on the hardware that cannot be done in simulation. For instance, this may involve interfacing with outside devices and sensors like external video sources or ethernet connections. The results of the test can then be accessed through BeetleboxCI’s web interface.
Continuous Deployment
Finally, once all tests have been completed, the new files need to be deployed into the real world. This can be manged by a process known as Continuous Deployment, which automatically releases updates into a production environment. FPGAs are used in a variety of different environments from tiny devices that will need to be updated over-the-air (OTA), to on-premise servers, to large-scale Cloud farms. Using BeetleboxCI developers are able to effectively manage this process, no matter what the environment.
Introducing the CI tool for FPGAs
All this sounds great, but how can developers build such a CI system without it risking taking weeks or even months? Thankfully, with BeetleboxCI we are constantly releasing new features and materials that make setting up simple. We are currently releasing our getting started with Continuous Integration (CI) and AMD (formerly Xilinx) FPGAs, which is a great place to start.
Don’t believe that setting up an continuous integration system is beyond budget. An effective process can improve quality, increase consistency and make teams better at collaboration. It is a practice that has become standard in the software industry and will soon also become popular in the FPGA world as well.