Here at Beetlebox, we are real Raspberry Pi enthusiasts. We’ve always been fascinated with the potential of microcontrollers. They can control and automate a variety of tasks from simple button presses to running machine learning algorithms. In this article, we want to talk about how we can make them even more effective with Continuous Integration (CI)
The Raspberry Pi Pico is a micro-controller that has been gaining popularity amongst hobbyists and professionals alike thanks to its low cost and ease of programming.
Naturally, when used in a professional setting, we need to ensure that our systems are regularly tested and that the hardware is accessible across the team. Using CI stops developers needing to constantly repeat the tasks required to test hardware.
In this article, we will be explaining what CI is and why we wish to combine it with our Picos. We will explore the problems, we encountered and the general approaches we took to solving them.
Introducing Continuous Integration (CI)
Continuous Integration is a software development practise where development is not siloed to developers working individually on their local machines with a raspberry pi next to them and only contributing at the end of the project. Instead, developers all regularly contribute to a single, shared code repository.
The code from this repository is then built, tested and deployed on centralised servers that are connected to multiple Raspberry Pis. Continuous Integration software performs this process through pipelines that are a series of jobs that run through the build and test process. These jobs run in execution environments known as runners.
Unlike automating other forms of software, microcontrollers have some unique quirks to them. In this article, we will share some of our experiences and look at how we solved them. Do not worry, this article is just an overview and not a laundry list of instructions and code.
CI Testing on real hardware
When we are using microcontrollers, it is mostly because we wish to interact with the real world in some way. Whether this be reading sensor data or driving motors. This means relying on things like emulators or virtual devices of limited use because we are not using real world data.
We need to ensure that the microcontrollers are passing tests using real components. Running automated tests on hardware itself is known as Hardware-in-the-loop (HIL) testing. It is a necessary feature in any testing pipeline but building it can be challenging for the following reasons.
There is no operating system (OS).
Most Continuous Integration software will make one very simple assumption: the device we are working on will have an OS. Microcontrollers do not have an OS.
When we program the Pico, it runs a single executable that includes everything needed. This means that we can’t run multiple programs that might needed to execute and monitor multiple tests.
Continuous Integration needs to run jobs on machines called runners. These runners though require some sort of OS to execute commands. This means we cannot directly run commands on a Raspberry Pi Pico.
In summary, we cannot run a program to monitor tests and we cannot execute tests directly on the Pico either. What do we do?

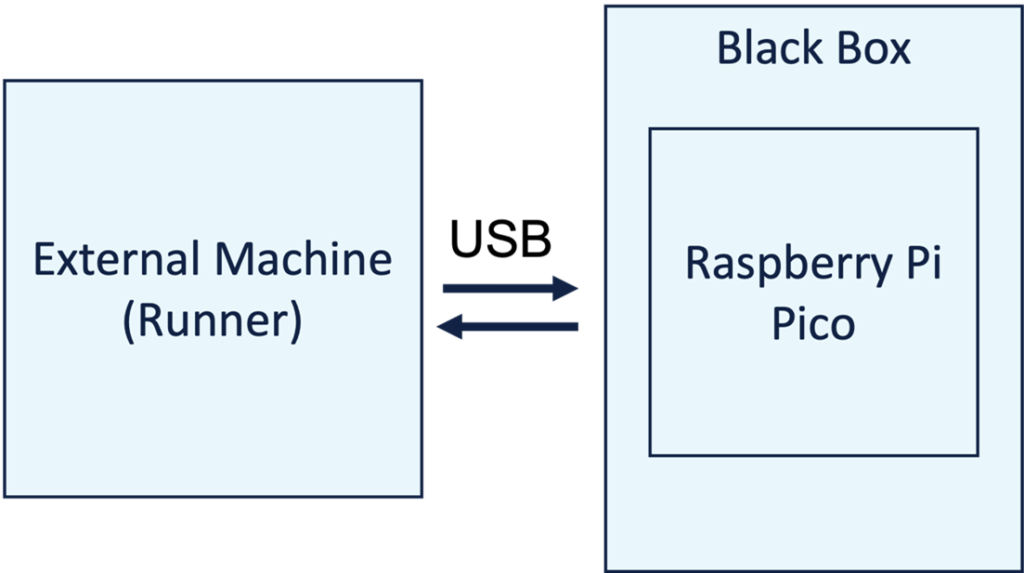
The above figure shows how we can overcome this problem Essentially, we need to treat the microcontroller as a black box and have an external machine input command, monitor data, and retrieve output, via the micro-USB interface.
The external machine is then used as a runner for the CI pipeline. This means we can run any commands we need or even run multiple programs at once with no issue.
Getting files onto the system with no button press
The simplest method for programming a Pico is to hold down the button to place it in BOOTSEL that allows the user to upload firmware. When building automated pipelines, we cannot hold down this button, so we need to find alternative ways of programming our Picos. To do this depends on if we are using MicroPython or C.
If we are using MicroPython, we only need to upload the MicroPython firmware once. Once we have done that we can then transfer over Python files and execute them remotely.
There are two programs to make this possible.
- Adafruit-ampy: A simple program designed to manipulate files and execute code over serial connections.
- Rshell: A remote shell program designed to use MicroPython’s interpreter to manipulate files and get system information
For C, we use a program called Picotool that allows us to interface with executables on the device without being in BOOTSEL mode.
Requiring USB access
To access Picos, the machine that the CI pipeline runs on will need to have access to the USB ports. This point sounds obvious but can be rather challenging to solve. Hosting a CI tool on the Cloud will mean that it is impossible to directly communicate with the Pico. There are two possible solutions to this:
- Use on-premises servers that can access USBs: The simplest method is to ensure that the server you run the CI pipeline is running locally and has access to the USB ports. Security can be an issue for this method though because USB access will normally require admin permissions.
- USB-over-ethernet: There are certain devices that can allow servers to access USB over ethernet connections. This is the most scalable method as it allows multiple machines to access the same USB devices and would be most suitable when needing to use multiple Picos at once. It is also the most secure as we have no admin access needs. The downside is that these devices can be expensive and not worth it for initial experimentation with CI.
- SSH into local machines: Another potential solution is to use a local machine that is connected to the CI servers via SSH. This method means that we can still use the cloud, but without having to invest in new equipment. This can also present a security concern as the server will be remotely executing commands on a local computer.
Conclusion
Requiring USB access is a good example of a problem that would simply not be encountered when not developing for microcontrollers. We also encountered problems as simple as not being able to hold a button or that Picos have no OS. Many embedded engineers become concerned about implementing CI because of these new and unsolved problems. We created this guide though to outline some of these problems and as more becomes known to the greater community the barrier to using CI becomes lower.


