09 Nov
Introduction
In this section, we will be exploring the basics of setting up continous integration on a Raspberry Pi. Our first challenge will be remotly communicating with our device over SSH, whilst then creating and using SSH keys to keep our communication secure. Afterwards we will be exploring some key concepts within continuous integration, such as pipelines, workflows and jobs. We will then learn how to put these key concepts into practise. We will then look at how the BeetleboxCI webapp shows continuous integration and how we can monitor our pipelines. Finally, we will be taking a deep dive into all the configuration files and scripts needed for the pipeline to sucessfully run.
Contents
All code used in these tutorials can be found in the following GitHub repository.
- Introduction
- Part 1: How to setup continuous integration on raspberry pis (here)
- Part 2: Connecting and receiving data from sensors (coming soon)
- Part 3: How to automatically monitor your Raspberry Pi with continuous integration (coming soon)
- Part 4: How to use continuous integration to update your Raspberry Pi application (coming soon)
Requirements
- A Raspberry Pi (We use a Raspberry Pi 4).
- A GitHub account (Other Git providers will work as well).
- A BeetleboxCI account (First month is free).
Setting up our Raspberry Pi
The first task we have is to get our Raspberry Pi up and running. We need it to be connected with a mouse, keyboard and monitor. This is covered in the official documentation for the Raspberry Pi which you can find here.
Once the raspberry pi has properly booted, we need to enable it to communicate it via SSH. Make sure it is connected to the local network via Wi-Fi or by plugging in an ethernet cable to the router. Afterwards, we need to enable the SSH server, which is disabled by default, from the raspberry pi’s desktop:
- Go to ‘Raspberry Pi Configuration’ from the ‘Preferences’ menu
- Go to the ‘Interfaces’ tab
- Click ‘Enabled’ for ‘SSH’
- Confirm using ‘OK’
That is all we need to do directly on the raspberry pi. We can disconnect any monitors, keyboards and mice connected to it. Everything will now be done through our local computer.
Connecting to the Raspberry pi
To connect to the raspberry pi, we need two things. We need to know the IP address of our raspberry pi and we also need to generate a SSH key that will allow us to communicate with the raspberry pi securely without the pi asking for a password.
This first step is to find the IP the raspberry pi belongs on. On the local computer, in the terminal provide:
ping raspberrypi.localIf it is reachable, the ping will show the raspberry pi’s IP address.
Now we need to generate the SSH key that will let us connect. To do this:
- Generate a new SSH key by entering ‘ssh-keygen’ into our local computer’s shell.
- When prompted to “Enter a file in which to save the key,” we suggest using the default location of ‘~/.ssh/id_rsa’
- When asked for a passphrase, leave the field empty for no passphrase.
- It will now generate two keys. A private key called ‘id_rsa’ which will be used to connect to the raspberry pi and ‘id_rsa.pub’ which is to be placed on the raspberry pi.
- We now need to provide the key to our raspberry pi, which can be done through this command:
cat ~/.ssh/id_rsa.pub | ssh <raspberrypi-name>@<raspberrypi-ip> 'mkdir -p ~/.ssh && cat >> ~/.ssh/authorized_keys- Let’s make sure we can login to the raspberry pi without being asked a password:
ssh <raspberrypi-name>@<raspberrypi-ip>- If we can login without being asked for a password, then this process has been succesful. If this process fails, please see the official raspberrypi documentation on connecting via SSH.
Now that we have secure, passwordless access to our raspberry pi, we can start automating it.
Automating hello world with continuous integration
The goal for us now is to build an automated flow that can get our raspberry pi to say ‘Hello World.’ This section will involve explaining some important concepts used in continuous integration as well as how to perform them practically on our raspberry pi.
Automating with pipelines
A pipeline is simply a series of processes that must be performed to change source code to a full functioning and tested version of the software. We can think of it as the machine performing all the steps that previously a user would need to perform. When used effectively pipelines increase consistency in process and reduce human error.
The pipeline we want to put together is very simple:
- Take a simple script from a git repository and place it on the raspberry pi
- Execute the script and say “Hello World”
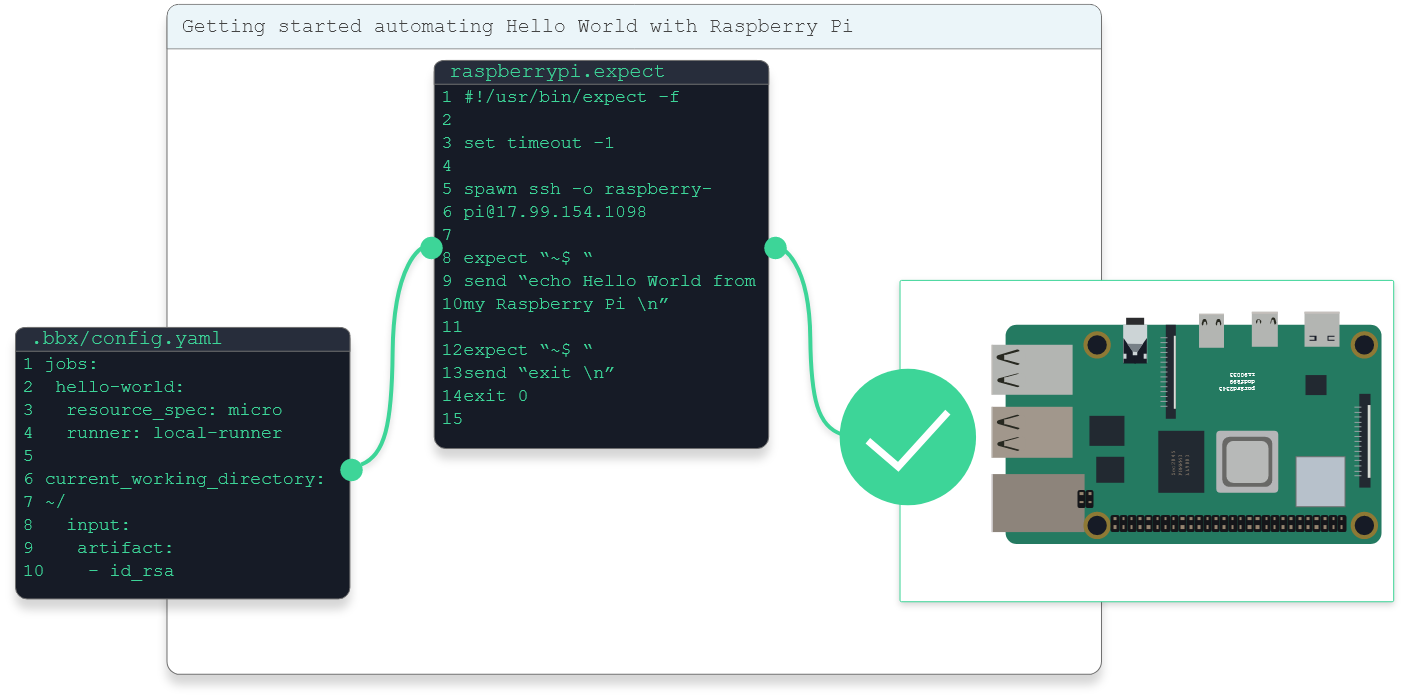
To build a pipeline, we need a configuration file that will tell BeetleboxCI all the processes that need to happen. This configuration file is called ‘config.yaml’ and is placed inside our git repository under the folder ‘.bbx.’
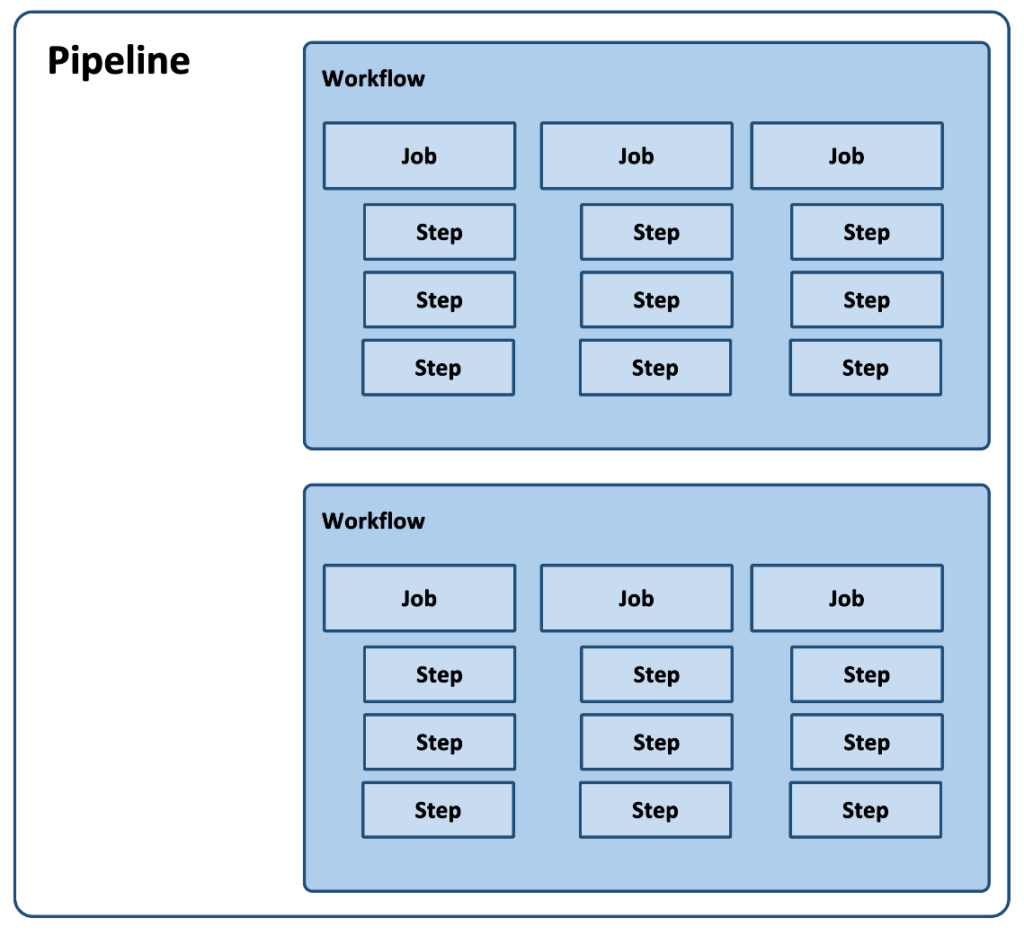
Every pipeline is made up of a series of workflows, which are defined in the ‘config.yaml’ file. Workflows consist of several jobs that are the individual processes that need to be performed. For instance, an entire workflow may be devoted to running the testing process for an application on the raspberry pi. Each individual job would then be one test that needs to be run.
A job is a set of linear steps that need to be run. Every job is executed in a clean container known as a runner. These runners provide a separate environment for every job. They are also designed to provide the tools and software needed to run those jobs.
Using our testing example, a job would be a test that needs to be run. The steps could be individual scripts that handle that test within that closed environment.
A pipeline runs when one of its workflows are triggered. Workflows can be triggered multiple ways:
- Manual: When a developer presses the run button in BeetleboxCI.
- Push: When a developer pushes through a change to the repository.
- Scheduled: When the run is scheduled to run at a specific time and date. For instance, every Thursday, monthly or nightly.
Often files are needed as inputs or are generated by jobs and need to be kept after a workflow has been run. These files are called artifacts and are used for long-term storage and help provide a single file source for all your team. They provide all the files need for jobs to complete properly.
Now we have explored all the concepts we need for a pipeline, let’s make one.
Creating a pipeline
In this section, we will provide the practical steps to apply all the things we learned about pipelines to automate our raspberry pi. All of our code can also be found in the following public GitHub repository.
- Create a new repository inside GitHub.
- In your GitHub repository, select ‘Add file’ -> ‘Create new file’
- Name the file ‘.bbx/config.yaml’
- Copy the following code into the ‘config.yaml’ (.bbx/config.yaml) and select ‘Commit new file’:
runners:
 local-runner:
  image: public.ecr.aws/y2s4f3y9/ubuntu-generic:latest
jobs:
 hello-world:
  resource_spec: micro
  runner: local-runner
  current_working_directory: ~/
  input:
   artifact:
    - id_rsa
  steps:
   - run:
      name: Open connection to pi
      command: |
       eval `ssh-agent -s`
       chmod 600 ./id_rsa
       ssh-add ./id_rsa
       chmod 777 ./raspberrypi.expect
       ./raspberrypi.expect

workflows:
 hello-world-workflow:
  jobs:
- hello-world- Using the same process, create a new file inside the repository called ‘raspberrypi.expect’ and copy in the following code. Make sure to replace <raspberry-pi-login> and <raspberry-pi-ip>.:
#!/usr/bin/expect -f

set timeout -1

spawn ssh -o "StrictHostKeyChecking=no" <raspberry-pi-login>@<raspberry-pi-ip>

expect "~$ "
send "echo Hello World from my Raspberry Pi \n"

expect "~$ "
send "exit \n"
exit 0- Launch BeetleboxCI.
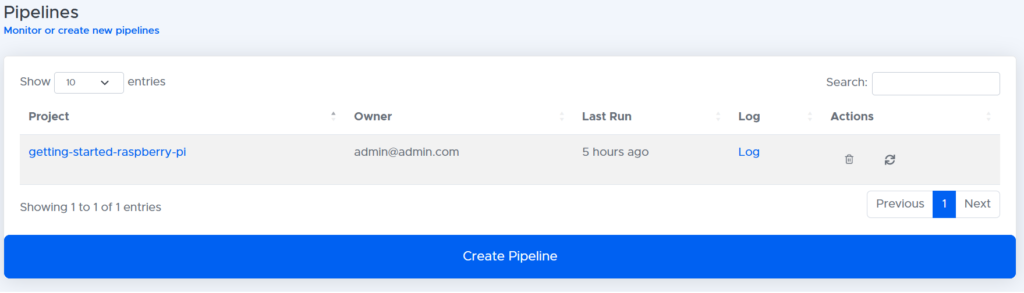
- From the dashboard, go to ‘pipelines’ and select ‘Create your first pipeline.’
- For project name use ‘getting-started-raspberry-pi’, for ‘repository url’ provide the repository url than can be found in the GitHub Repository. Under ‘Code’ and then ‘SSH.’

- For access to GitHub repos, we need SSH authentication, which means we need to generate another key. On the local computer run the following command:
ssh-keygen -t ed25519 -C "your_email@example.com"- When prompted, save the key in the default location.
- When asked about passphrases, please leave blank.
- Add this key to the GitHub account. Instructions can be found here in the GitHub documentation.
- We now need to provide the private key to BeetleboxCI. On the local computer, display key:
cat ~/.ssh/id_ed25519- Copy and paste all of this code into ‘SSH Authentication’ section and press ‘Proceed’ when finished.
This should take us back to the ‘pipelines’ screen where we can see our project.
Uploading artifacts
We need to upload our SSH key, so that BeetleboxCI may provide it to runners to access the raspberry pi:
- To do this , click ‘Artifacts’ on the sidepanel.
- Then click ‘Upload File’
- In the file upload screen click ‘Browse’ and locate the ‘id_rsa’ private key file.
- Give it an Artifact Type of ‘Miscellaneous.’
- Press ‘Submit’ when finished.
Launching our pipeline
We have succesfully added a pipeline and so our last step is the easiest and most exciting. Running it!
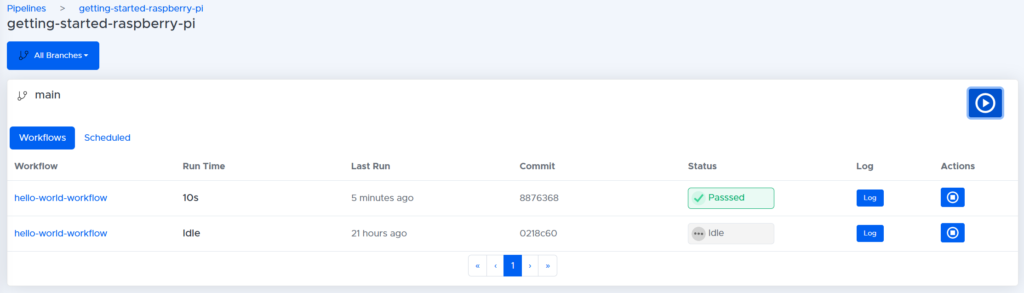
In the pipelines page, click ‘getting-started-raspberry-pi.’ We are then greeted with the following screen:
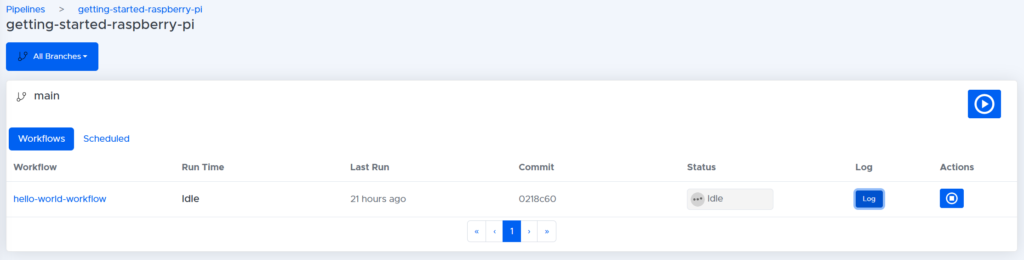
To run the pipeline. Press the play button on the top right of the screen. When prompted if we are sure we want to run the pipeline, click ‘yes.’ This will begin the pipeline and if all goes well, after a few minutes, it should pass with a green tick:
If we click on the first workflow, ‘hello-world-workflow,’ we get an overview of the jobs that have just run:
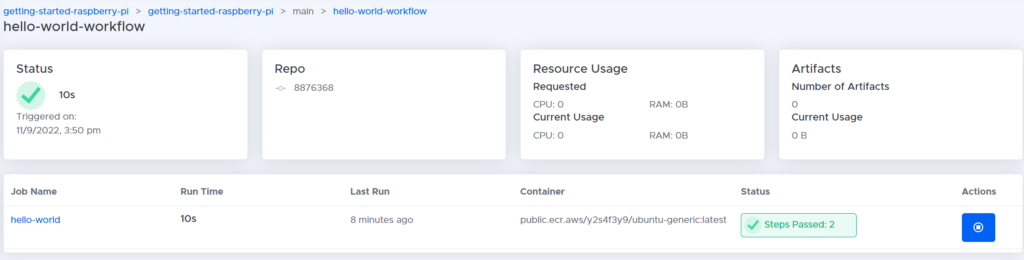
We see this workflow consists of a single job called ‘hello-world.’ If we click on ‘hello-world,’ we can see a breakdown of all the steps in this job:
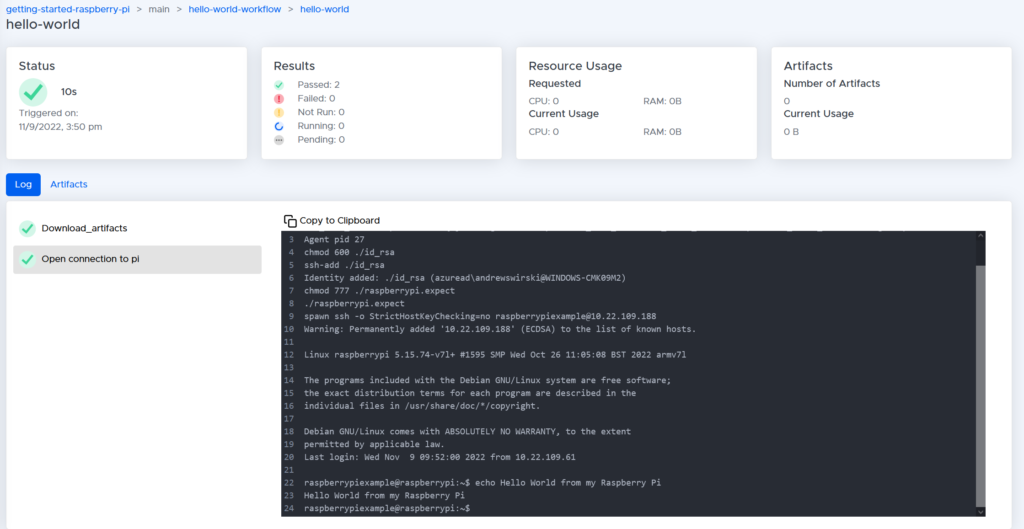
On this page, we are provided with all sorts of information about our job, including its status, when it was triggered and how long it took. Most crucially, we can see all the steps that were performed:
- Download_artifacts is a step that is automatically added by BeetleboxCI that will download all the artifacts, we specified in our config file and place it into our runner.
- ‘Open connection to pi’ is the step that we added to the ‘config.yaml’ file. As we can see we provided instructions to the raspberry pi to say ‘Hello World from my Raspberry Pi’ and our logs indicate this was successful.
We manage to achieve a lot in a very short amount of instructions, so let us know take a step back and see what is actually happening.
Explaining our continuous integration setup
Now that we have succesfully run our pipeline, we can explain how the setup works. BeetleboxCI always treats external devices as black boxes, where we cannot download any software onto the device or have any presumptions about what is on the machine. The only thing we can do is have our pipeline communicate with these external devices depending on what inputs we are provided. To take a look at how we achieved this, we can do a deep dive into the ‘config.yaml’ file. The first place to start is to look at the workflows:
workflows:
 hello-world-workflow:
  jobs:
   - hello-world
Here we have declared a single workflow ‘hello-world-workflow’ which is made of a single job ‘hello-world.’ We see this reflected in the BeetleboxCI webapp when we run through it. To use a job, it must also be declared within the yaml:
jobs:
 hello-world:
  resource_spec: micro
  runner: local-runner
  current_working_directory: ~/
  input:
   artifact:
    - id_rsa
  steps:
   - run:
      name: Open connection to pi
      command: |
       eval `ssh-agent -s`
       chmod 600 ./id_rsa
       ssh-add ./id_rsa
       chmod 777 ./raspberrypi.expect
       ./raspberrypi.expect
The jobs section of the ‘config.yaml’ consists of all the jobs that are available for the workflows. We can see the job ‘hello-world’ that is used in our workflow. Let’s break down each section within that job:
- resource_spec: This is the resource specification that is used by the job. Each job has a certain amount of RAM and processors that it needs to run succesfully. In this case, we need very little resource, so we declare ‘micro,’ which provides half a processor and 2GiB of RAM. BeetleboxCI manages the resources of the server and only queues jobs when enough resources are available. If the resource usage is larger that it needs to be, then this can block other jobs from running.
- runner: The runner that this job is to use.
- current_working_directory: The working directory that the shell will run in. All artifacts are placed in the current working directory.
- input: The input determines what files need to be input into the job before it runs. As we already have seen we need to input our rsa key ‘id_rsa.’ Using this will also generate a new step called ‘download_artifacts’ which happens at the beginning of every run.
- steps: Steps is the linear sequence that the job must execute successfuly to pass. We first declare that we wish to have a step type of ‘run’ that is called ‘Open connection to pi.’ We then send through a multi-line command to the shell.
Finally we have the runner section:
runners:
 local-runner:
  image: public.ecr.aws/y2s4f3y9/ubuntu-generic:latest
This section determines all the runners that are needed for our jobs. We have a single runner we call ‘local-runner’ and it’s container image is a ubuntu-generic which can freely downloaded from Amazon’s AWS Elastic Cache Runner service.
We will now look at the commands in more detail:
       eval `ssh-agent -s`
       chmod 600 ./id_rsa
       ssh-add ./id_rsa
       chmod 777 ./raspberrypi.expect
       ./raspberrypi.expect
We begin with the boiler plate code that is needed to begin our SSH agent in our job and add the key we downloaded as an artifact. We then also execute an expect script called ‘raspberry.expect’ which is held within our repository. Expect is a program that communicates with other interactive programs according to a script we define. Using expect we can treat our raspberry pi as a black box. We will now examine this file:
#!/usr/bin/expect -fThis first line is called a shebang. It tells our job which is piece of software to use to execute the script.
set timeout -1We set an infinite timeout , so that we know that know errors are caused by a command taking too long to respond.
spawn ssh -o "StrictHostKeyChecking=no" <raspberry-pi-login>@<raspberry-pi-ip>The spawn command creates a new process that the expect script will communicate with. In this case, we want to communicate with our raspbeery pi through SSH.
expect "~$ "
send "echo Hello World from my Raspberry Pi \n"

expect "~$ "
send "exit \n"
exit 0
In this section, we say what to wait for before sending a command to the raspberry pi. In this case we wait for “~$” which is when the raspberry pi can be provided with a command. We then send an echo command to our raspberry pi to get it to say “Hello World from my Raspberry Pi.” When that has finished we expect another end of line with “~$.” We then exit out of the raspberry pi and then succesfully exit out of the expect script with “exit 0.”
There we have it. How we can successfully have a CI server communicate with a raspberry pi by treating it as a black box.
Conclusion
In this section, we have explored all the necessary steps needed to automate a raspberry pi with continuous integration and BeetleboxCI. We have shown how to securly communicate with the raspberry pi over SSH as well as to how communicate and setup SSH keys. Afterwards, we explored building a repository within GitHub that contained all the configuration information that was needed to build a basic pipeline. We then got our raspberry pi to automatically say Hello World and explained how all the scripts worked in detail.
In our next tutorial, we will be exploring how to make more pratical use out of raspberry pi by using continuous integration to retrieve sensor information from it.