Since its arrival in 2012, the Raspberry Pi board series has taken the embedded industry by storm and introduced a new generation to embedded computing. With its ready availability, it is also the perfect board to show how to implement DevOps and continuous integration (CI) for embedded systems.
In this tutorial, you will be learning about a basic setup that will allow you to connect a Raspberry Pi 4 device to a CI server and then run commands directly on that Pi. We will be using our own CI platform, BeetleboxCI. If you would like access to a free trial, our team would be happy to chat.
What is BeetleboxCI?
BeetleboxCI is a continuous integration (CI) and continuous delivery (CD) platform for IoT, embedded, and hardware projects. It helps teams to automate the building, testing, and deployment of their code, saving time and reducing errors.
The key features are:
- Automated builds and tests: BeetleboxCI can automatically build and test your code on a variety of hardware platforms. This helps you to identify and fix errors early on in the development process.
- Deployment to devices: BeetleboxCI can deploy your code to devices such as microcontrollers, microprocessors, and single board computers. This makes it easy to get your code running on real hardware.
- Collaboration: BeetleboxCI provides a central place for teams to collaborate on their development projects. Teams can track progress, review code, and share results.
CI for Raspberry Pis
BeetleboxCI has the capability to communicate with external devices and run commands on them. It can also transfer files to and from devices as well as program microcontrollers. It communicates with external devices based on the protocol and settings defined by the user.
This tutorial demonstrates the use of the devices feature of BeetleboxCI to run commands on an external device, namely a Raspberry Pi. We will use BeetleboxCI to access the Raspberry Pi through SSH and print Hello World to the terminal.
Wiring up the Raspberry Pi
For this exercise, the Raspberry Pi device needs to be wired to the same network as the server running BeetleboxCI, such that the server will have SSH access to the device. If the Raspberry Pi is connected to the same router or switch as the BeetleboxCI server, then its IP address would have been automatically assigned.
Make sure you know the IP address and login details of the Raspberry Pi before you proceed.
You can check the IP addresses of the devices on your network by running the ‘arp –a’ command from the BeetleboxCI server or any other Linux device on the network. If you have the right permissions, you can check the DHCP table on the router or DHCP server on your network to see the IP address of the device.
If you do not have the permissions to access network details, you can alternatively wire up the Raspberry Pi directly to an ethernet port on the BeetleboxCI server. This requires the IP addresses of the ethernet connection on the server side and the device side to be manually assigned through ifconfig, but the details of this are beyond the scope of this tutorial.
For this exercise, we assume the following details to log in to the Raspberry Pi:
IP: 192.168.1.92
Username: pi
Password: raspberry
Add a Device to BeetleboxCI
BeetleboxCI maintains a registry of devices that are available. To communicate with the device through the built-in features of BeetleboxCI, the device needs to be registered on the application.
In this example, we set up the Raspberry PI such that the webapp can form an SSH connection with the device through password authentication, where sshpass will input the password automatically.
- Browse to the BeetleboxCI webapp at http://[SERVER_ADDRESS]:32767
- Click Devices on the left hand column.
- Click Register Device
- Add the following YAML code to the editor. You may need to amend the IP address (192.168.1.92) as necessary to the IP address of your own Raspberry Pi device as well as amending the username (pi) and the password (raspberry):
devices:
 raspberry-pi:
  connection: sshpass -p raspberry ssh -o "UserKnownHostsFile=/dev/null" -o "StrictHostKeyChecking=no" pi@192.168.1.92
prompt: "$"- Click save on the top right of the editor.
The definition of the device consists of a connection field, which tells BeetleboxCI how to communicate with the device, and the prompt specifies the character or string present in the terminal of the device (e.g. $ for a linux terminal).
Create a Git Repository
BeetleboxCI requires every pipeline to be linked to a code repository which forms the code base of that pipeline. For this tutorial, we will use Github, but BeetleboxCI also supports Bitbucket and Gitlab and those will work too for this tutorial.
- Create a new folder called .bbx in a Github code repository.
- Create a file called config.yaml in the folder you just created and copy in the following code.
runners:
 local-runner:
  image: public.ecr.aws/y2s4f3y9/ubuntu-generic:latest
jobs:
pi-hello-world:
  resource_spec: small
  runner: local-runner
  current_working_directory: ~/
  device: raspberry-pi
  steps:
   - run:
      name: Setup
      command: apt-get install sshpass
  - run:
      name: Run device
      on-device: True
      command: |
      echo Hello World
workflows:
 pi-hello-world-workflow:
  jobs:
   - pi-hello-world
This code defines a runner to use to execute the commands, and it has one workflow which contains one job. The job runs on the runner, and uses the raspberry-pi device. There are two steps in the job: The first step installs sshpass on the runner, and the second step runs a command on the device, which was defined earlier on.
Creating a Pipeline
Now that the device has been registered, we can create a pipeline which uses both the code repository and the device you created above.
- Browse to the BeetleboxCI webapp at http://[SERVER_ADDRESS]:32767
- Click Pipelines on the left hand column.
- Click Create Pipeline.
- In the following screen, fill in the following:
Pipeline Name: pi-hello-world
Repository URL: https://github.com/<username>/<repo_name>
Authentication Settings — Username: <The name of your git account>
Authentication Settings — Password: <Github personal access token>
If you created your repository with public access, then the authentication information will not be necessary. Note that Github no longer supports password authentication for cloning repositories, so a personal access token is required. If you do not already have a personal access token for Github, you can follow this link from Github which shows how to create one.
As an alternative to your username and a personal access token, you can generate an SSH key to authenticate access to private git repositories (given that the public key is added either to your Github account or just as a deploy key to the repository). More information on this can be found in the VCS Integration section of the BeetleboxCI documentation.
- Click Proceed. You will now be redirected to the pipelines page where you can see the project that you just created. If prompted to set up the configuration file for this pipeline, click No, since you have already set it up when you created the git repository.
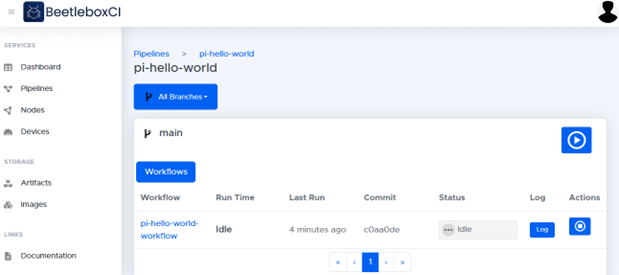
- On the pipelines page, click pi-hello-world so see the workflows in this pipeline.
- Click the run button on the top right hand corner of the workflows list. The pipeline will begin running and it should take no more than a few minutes to complete.
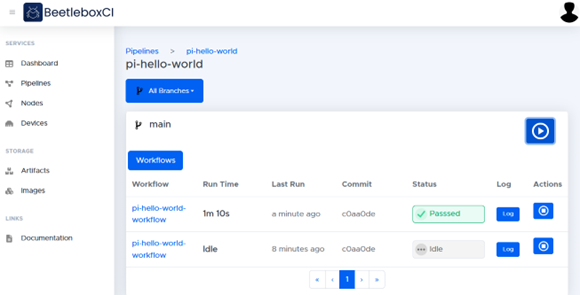
- You will see “Passed” on the pi-hello-world-workflow once it has completed (or “Failed” if something has gone wrong).
Viewing our output of our CI
You can check the logs to check if the output looks correct. In the page you are currently on, you will be able to view the workflows of the pi-hello-world project. There will be a single workflow named pi-hello-world-workflow, which will take us to the jobs that make up that workflow.
- Click the name of the workflow, pi-hello-world-workflow, to view the jobs for this workflow.
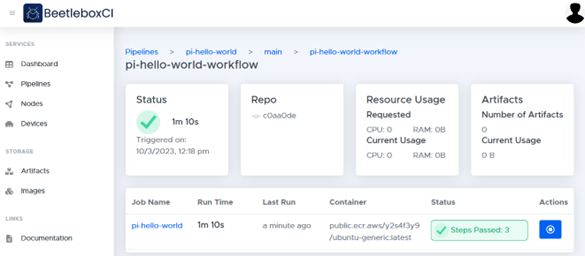
- In the jobs page, you may view the jobs that are used in the pi-hello-world-workflow. Click on the job name pi-hello-world
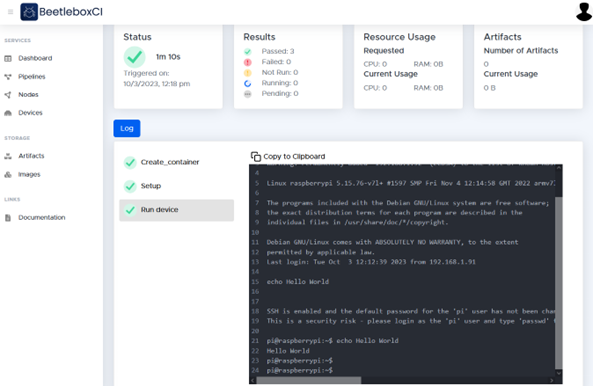
- From here, you will be able to view details about the job, including an overview of its status as well as logs.
- By checking out the Log, you can see the generated logs by the job. In this case, you will be able to see that the job has successfully outputted the Hello World message.
Conclusion
Raspberry Pis are a brilliant first step on your way to learning embedded DevOps. You are now able with BeetleboxCI to:
- Connect a Raspberry Pi to a Beetlebox server securely via SSH.
- Creating a Git Repository and connecting to BeetleboxCI.
- Creating a pipeline and running code on the Raspberry Pi
- Viewing the output of the CI