
Over at Beetlebox we are excited for the release of Vitis, which is the unification of all of Xilinx’s previous software into a single package. We have been working hard on computer vision using this platform and thought that we could provide some help to others wanting to get started on Xilinx’s development boards. This tutorial will be a multi-part series covering the basics of getting started with computer vision and Vitis and will be covering:
- Getting XRT and Linux up and running (Current Page)
- How to build “Hello World” and understanding Vitis Development Flow
- Using OpenCV on the embedded system
- Using Vitis Vision Library
- Accelerating Computer Vision using XRT and Kernels
We hope these tutorials will be useful for anyone looking to get into computer vision on FPGAs.
Part 1: Getting XRT and PetaLinux working on Xilinx boards
What is XRT and why do we need it?
XRT acts as the interface between our acceleration kernels on the FPGA fabric and our CPU host and makes interacting between the CPU and the FPGA on our embedded system far simpler than previous methods. Acceleration using Vitis is very similar to how we accelerate using GPUs, in which we develop kernels that then are placed onto the FPGA fabric. XRT is also reliant on Linux so we need to get Linux running on our boards. XRT is not the only method for acceleration and the older methods that were used by Xilinx’s SDK can still be used with Vitis, but XRT presents the easiest method of acceleration. For more information on XRT and other methods please see here.
Instructions
Pre-requisites:
- A version of Linux officially supported by Vitis
- A development board officially supported by Vitis (packages for officially supported boards can be found here)
- Vitis 2019.2 (Installation instructions can be found here)
- Petalinux 2019.2 (Installation instructions can be found here)
- XRT 2019.2 (Installation instructions can be found here)
Our particular setup:
- Operating System: Ubuntu 18.04.02
- Development board tested: ZC702, ZCU104
Unfortunately, at the moment getting XRT and Linux working on Xilinx boards isn’t as simple as downloading many files. The files required are simply too large and must be generated using Petalinux. Fortunately, we have been provided with easy methods of generating these files through scripts.
- Go on to Github and clone the XRT repo. This repo will contain the all the scripts we need:
git clone --branch 2019.2 https://github.com/Xilinx/XRT.git
- Create a directory to store our builds in:
Mkdir ~/Petabuilds
Cd ~/Petabuilds
- To run these scripts, we need to source some commands from Vitis and XRT. If Vitis and XRT have been installed in the default directory this should be:
source /tools/Xilinx/Vitis/2019.2/settings64.sh
source /opt/xilinx/xrt/setup.sh
- Run the xsa_build script, which will run Vivado and build a platform for our particular board that is compatible with XRT. We will also need to point the script towards the tcl script of the board in the platform section of the repo:
- For the ZC702, this is the ZC702_base tcl script:
<xrt_repo_directory>/XRT/src/runtime_src/tools/scripts/xsa_build.sh <xrt_repo_directory>/XRT/src/platform/XRT/src/platform/zc702_base/zc702_base_xsa.tcl
- For the ZCU104, this is the zcu104_base tcl script:
<xrt_repo_directory>/XRT/src/runtime_src/tools/scripts/xsa_build.sh <xrt_repo_directory>/XRT/src/platform/zcu104_base/zcu104_base_xsa.tcl
- Check that a folder called xsa_build has been created and that this file contains a .xsa file
- Now that we have the XSA, we need to use the Petalinux tool to create the Petalinux Boot Image for the board itself. First we need to source Petalinux, which we can do through:
Source/petalinux/2019.2/settings.sh
- Now we can run the peta_build.sh script that will run through all the Petalinux commands to generate the correct files and copy these files over to the xsa_build folder. The peta_build script also provides a great base for customising future builds:
<xrt_repo_directory>/XRT/src/runtime_src/tools/scripts/peta_build.sh --bsp <bsp> ./xsa_build/<platform name>/<platform name>.xsa
- The build will take a while to run. Once it has finished, we run Vitis:
Vitis
- Once Vitis is launched click “Create Platform Project”
Provide a name for the new platform project, we will use “platform_1” and click ‘next’ - Click “Create from hardware specification (XSA)”
- In the “xsa file” directory navigate towards the .xsa file we generated: “<~/Petabuilds/xsa_build/<platform_name>/<platform_name>.xsa”
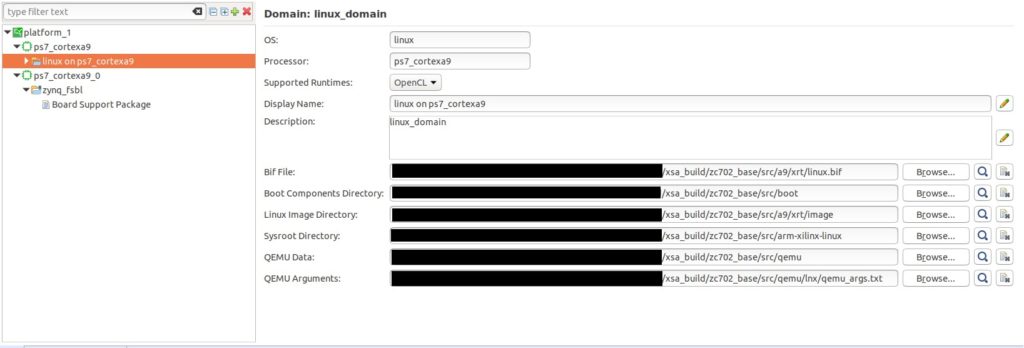
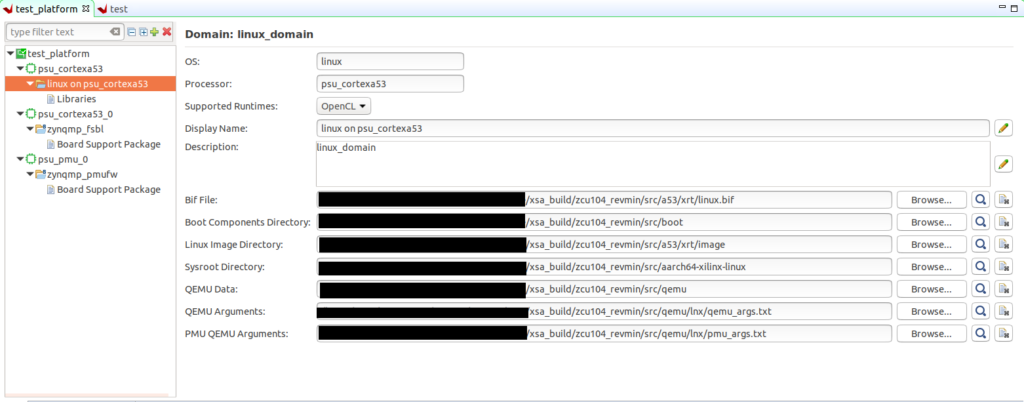
For the operating system select “Linux” and hit finish - Now we need to fill in the platform configurations. This differs slightly between MPSoCs and the Zynq-7000 series:
- Copy the contents of the “src/boot” folder into the “src/qemu” folder.
- Now hit the build button:

- We have finished building our custom xrt platform, it is time to build an application on it
- Go to “File>New>Application Project”
- Name it “test” and click next
- Select the custom platform we just built and click next
- Check Sysroot path is added, if not, add it
- In “Templates” select “Vector Addition” and hit Finish
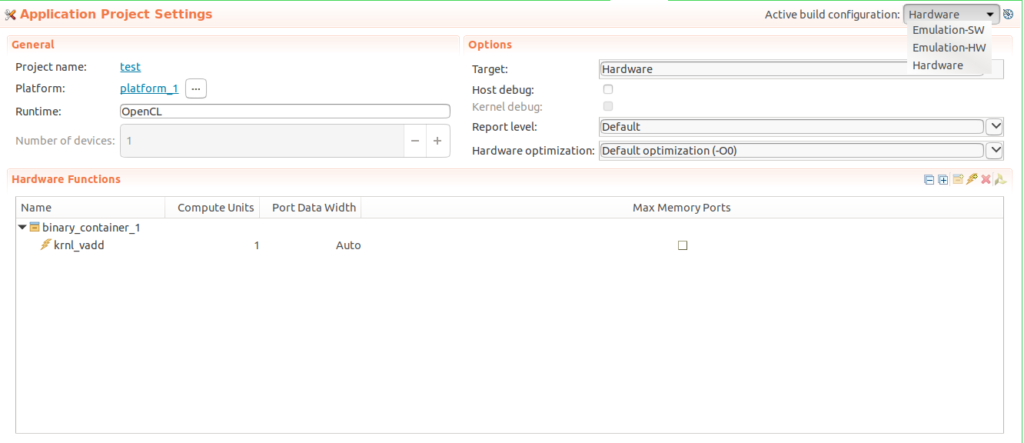
- In “Application Project Settings” set “Active Build Configuration” to “Hardware” and hit build:
- When finished building, expand the hardware folder in the “Assistant view” and right click SD card image and go to “Open>Open in File Browser”
- Copy contents of the folder onto the device’s SD card.
- Make sure the board is in “boot from SD card mode” and turn it on
- Click “Window>Show View”
- Search “Terminal”
- Select “Vitis Serial Terminal” and hit Open
- Use the “Plus” button on the top right-hand corner of the terminal window to launch “Connect to Serial Port”
- The COM port used will differ depending on the computer but here are the settings we use:
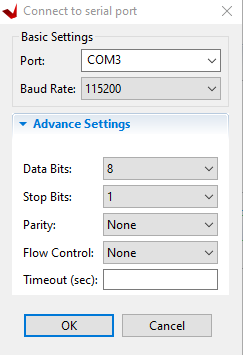
- Click OK
- The board should be booting or just finished booting
- In the terminal, run:
cd /mnt
./test.exe
- The terminal should display:
Usage: <xclbin>
We have successfully built a Vitis embedded system from scratch and made it execute code.
Next: How to build “Hello World” and understanding Vitis Development Flow
If you have enjoyed this tutorial but are in current need of talent to build advanced Computer Vision systems on FPGAs, consider joining our ClickCV Early Access programme. ClickCV Early Access provides bespoke service and support for developing advanced Computer Vision systems on FPGAs. We use our own proprietary Computer Vision Library, ClickCV, to provide our clients the cutting edge in low latency, high definition processing. Contact us today to find out how we could build your next-generation system.
About the Author: Andrew Swirski is the founder and managing director of Beetlebox, a Computer Vision Acceleration specialist. The company develops the Computer Vision Acceleration library called ClickCV, which is designed to fully utilise the hardware adaptability and performance of FPGA chips. Beetlebox is currently running an Early Access programme, where the company provides bespoke service and support to develop client’s Computer Vision systems on FPGAs. Before Beetlebox, Andrew Swirski previously worked at Intel (formerly Altera) in FPGA encoding and decoding. He completed a Masters’ in Electrical and Electronic Engineering from Imperial College London in 2017.

Hi, Thanks for the tutorial. I’m following the instrucción of Part 1, but I have a question. I the last part it’s necessary to copy the rootfs in the second partition? Where is it made?.
A lot of thanks.
Your Comment …
Hi, thanks for your useful tutorial. I have a question how can I add tensorflow in petalinux and vitis?
Hi Sahadrf,
To use Tensorflow, you will need to use Vitis AI, which is actually a separate tool to Vitis. The model can then be used to generate an IP which can be placed in Vivado. Here is the link for Vitis AI:
https://www.xilinx.com/products/design-tools/vitis/vitis-ai.html
Regards,
Andrew
Hi Andrew
Thank you very much for your help.
Best wishes
Hi Andrew,
Can you please clarify this command?
/XRT/src/runtime_src/tools/scripts/peta_build.sh –bsp ./xsa_build//.xsa
what should I type in place of the argument?
Regards,
David
” ” is the argument I need to clarify
Lord this is a limited text entry…..
Please clarify the BSP definition of this command.
Hi David,
Sorry for the limited text entry. We are still improving the blog.
For the bsp argument you will need to replace that with the BSP relevant to the board you are using. For Xilinx boards these can be found at:
https://www.xilinx.com/support/download/index.html/content/xilinx/en/downloadNav/embedded-design-tools.html
If you are using a custom board, you will need to generate your own BSP file through Vivado. You can also run the script without specifying the BSP but in our experience this can cause hanging on boot, so we recommend that you supply a BSP.
Regards,
Andrew
Hi Andrew,
Apologies for the rant… 🙂
I determined that I needed to point the tools to the BSP of my target dev-kit (ZCU102). The build completed and I’m making sound if slow progress.
This is a very useful Blog, please do keep it updated.
Regards,
David
Outstanding! Looking forward to more.