
Welcome to part 4! Over at Beetlebox we are excited for the release of Vitis, which is the unification of all of Xilinx’s previous software into a single package. We have been working hard on computer vision using this platform and thought that we could provide some help to others wanting to get started on Xilinx’s development boards. This tutorial will be a multi-part series covering the basics of getting started with computer vision and Vitis and will be covering:
- Getting XRT and Linux up and running
- How to build “Hello World” and understanding Vitis Development Flow
- Using OpenCV on the embedded system
- Using Vitis Vision Library (Current Page)
- Accelerating Computer Vision using XRT and Kernels
We hope these tutorials will be useful for anyone looking to get into computer vision on FPGAs.
Part 4: Vitis Vision Library
Vitis Vision Library is an accelerated Computer Vision library based on OpenCV and was formerly known as xfOpenCV that worked on the old Xilinx reVision platform. Xilinx is now making a push to provide accelerated versions of standard libraries, so that any software developer familiar with them can benefit from using FPGAs. Today we are going to look at getting started with the Vitis Vision library using the examples that Xilinx provides and running them in the Vitis IDE.
Unfortunatly as of 2019.2 the Vitis Vision library is not included in the Vitis IDE as standard, so we will need to put in some effort for it to compile and run properly.
FAST Corner Detection
Instead of including the entire library we are going to look at including an example design from Vitis Vision Library, which will be FAST Corner Detection. FAST is a feature detector that looks for corners in images and is commonly used in application such as image stitching, motion tracking and SLAM.
Instructions
Pre-requisites:
- Follow the previous tutorial to have a basic working system, except instead of using “Vector Addition” as our template we want to use “Empty Application”
- Follow the previous tutorial on OpenCV to have a understanding of how to transfer images on and off the Zynq
Our particular system:
- Operating System: CentOS 7.6 (This is different to the previous platforms we have been using because there seems to be a bug in Ubuntu that stops software emulation working properly for Vitis Vision Library)
- Development Board Tested: ZCU104
Troubleshooting missing OpenCV files
- On occasion running the script (peta_build.sh) from the previous tutorial will not generate all files we need for OpenCV in the system root (sysroot). An error often occurs that says that an OpenCV file or folder cannot be found
- To check that we have the correct files, open up the sysroot directory that we used in the previous tutorial:
- In ‘usr/include’ ensure the folders ‘opencv’ and ‘opencv2’ are present
- In ‘usr/lib’ ensure that the files libopencv_core.so, libopencv_core.so.3.4 and libopencv_core.3.4.3 are all there
- If these files are present then we can move to the next section, if not then we need to regenerate the sysroot
- Open a terminal in the folder that the peta_build.sh script generated
- For the ZCU104, this will be something like:
zcu104_base
- In the terminal run:
petalinux-build
petalinux-config -c rootfs
- This will run some commands and open the rootfs config menu. In usr packages ensure that the Petalinux OpenCV package is ticked and exit out of the menu. Run:
 cd images/linux
 petalinux-build --sdk
 ./sdk.sh
- These commands will take a long time to execute, but once they have finished this should have generated the sysroot with all the correct files in a folder such as:
<petalinux_build_directory>/zcu104_base/images/linux/sysroots/aarch64-xilinx-linux
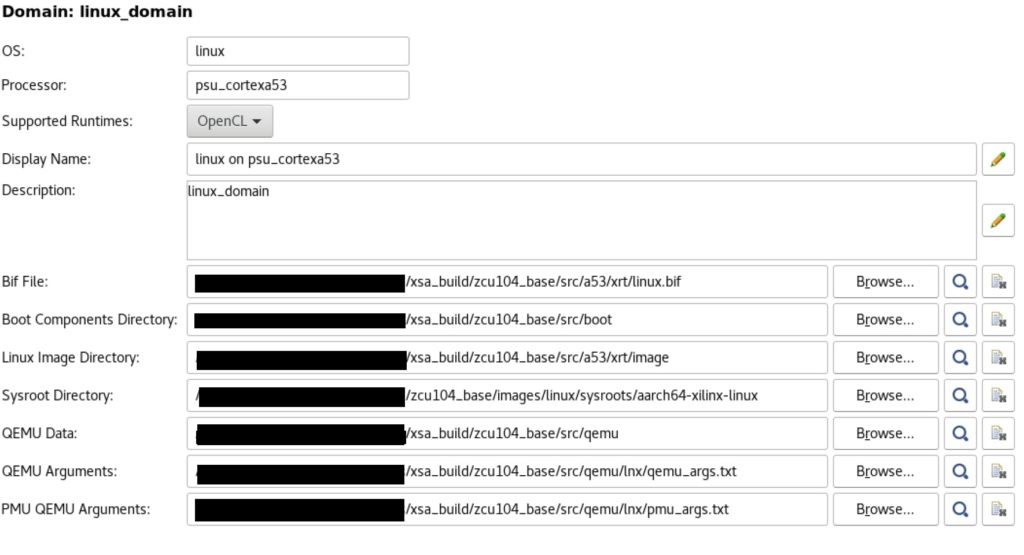
- All we need to do is then use this sysroot directory when we setup our Vitis platform, resulting in a project with the following settings:
Setting up FAST
- All the Vitis libraries are included in one repo, so we will need to pull that:
git clone --branch 2019.2 https://github.com/Xilinx/Vitis_Libraries.git
- The first thing we need to do is remove OpenCV from Vivado to stop it clashing with the OpenCV libraries in our sysroot. We do this by going to the installation directory of Vivado and finding the include library. If Vivado was installed in the default directory, this is:
/tools/Xilinx/Vivado/2019.2/include
- Remove the ‘opencv’ and ‘opencv2’ folders (We can just cut the folders up a level in case we ever need to restore it)
- We now need to copy into our project all the needed files to run FAST.
- In the folder:
<repo_directory>/Vitis_Libraries/vision/L2/examples/fast
- Copy the following files into the src of our application project:
- xf_fast_accel.cpp
- xf_fast_config.h
- xf_fast_tb.cpp
- build/xf_config_params.h
- In the folder:
<repo_directory>/Vitis_Libraries/vision/ext/xcl2
- Copy the following files into the src of our application project:
- xcl2.cpp
- xcl2.hpp
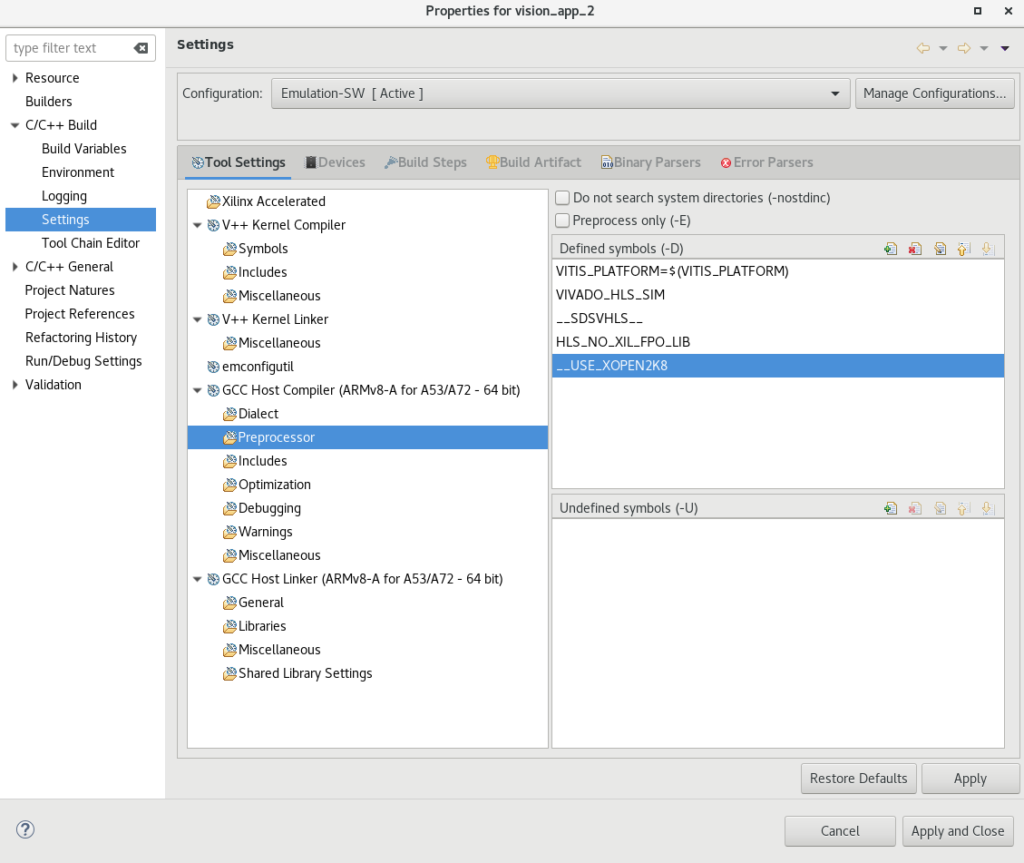
- Right click our application project in the Explorer tab and click ‘C/C++ Build Settings’
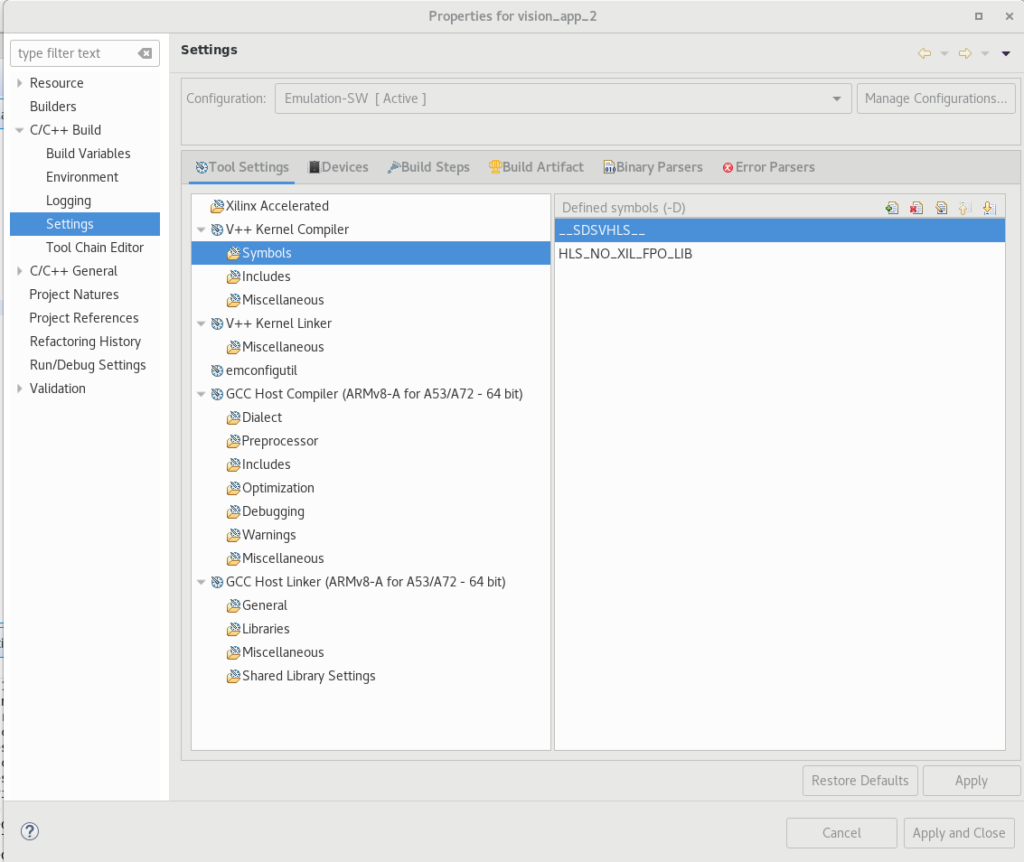
- Under ‘C/C++ Build’->’Settings’, go to ‘V++ Kernel Compiler’-> ‘Symbols’ and under ‘Defined symbols (-D)’ add:
- __SDSVHLS__
- HLS_NO_XIL_FPO_LIB
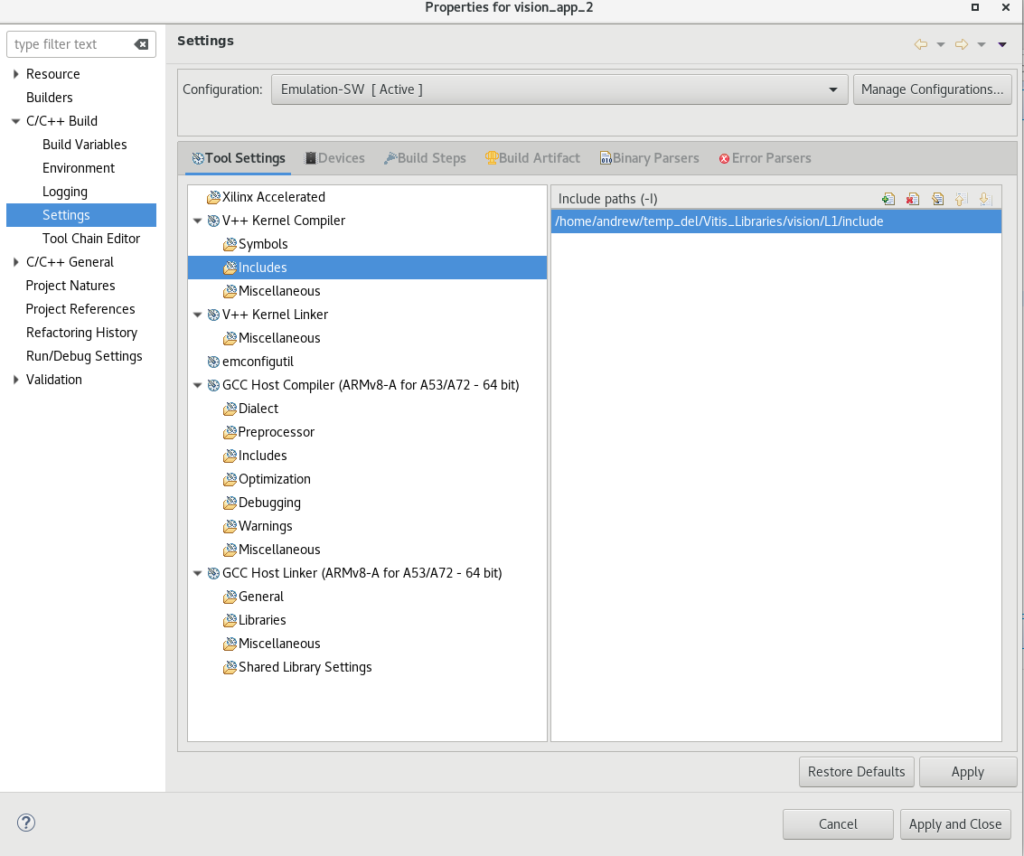
- Go to ‘V++ Kernel Compiler’-> ‘Includes’ and under ‘Include paths (-l)’ add:
- <vitis_repo>/Vitis_Libraries/vision/L1/include
- Go to ‘GCC Host Compiler’-> ‘Preprocessor’ and under ‘Defined Symbols (-D)’ add:
- VIVADO_HLS_SIM
- __SDSVHLS__
- HLS_NO_XIL_FPO_LIB
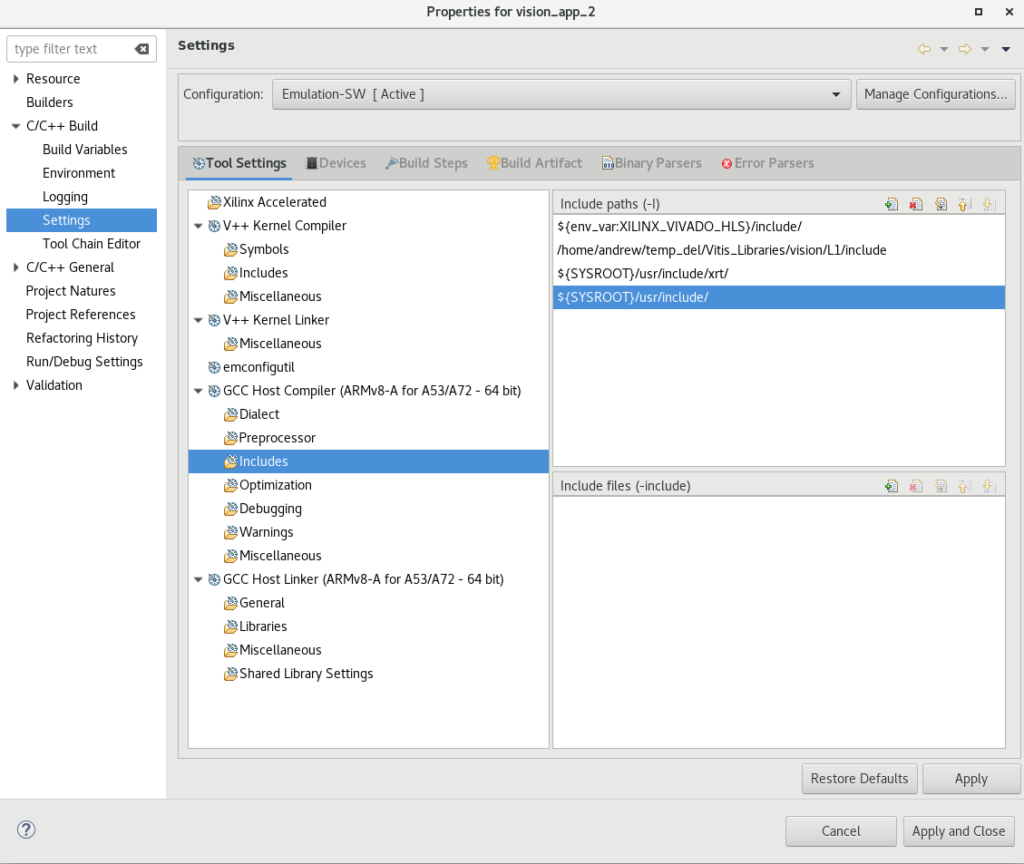
- Go to ‘GCC Host Compiler’-> ‘Includes’ and under ‘Include Paths (-I)’ add:
- <vitis_repo>/Vitis_Libraries/vision/L1/include
- ${SYSROOT}/usr/include/
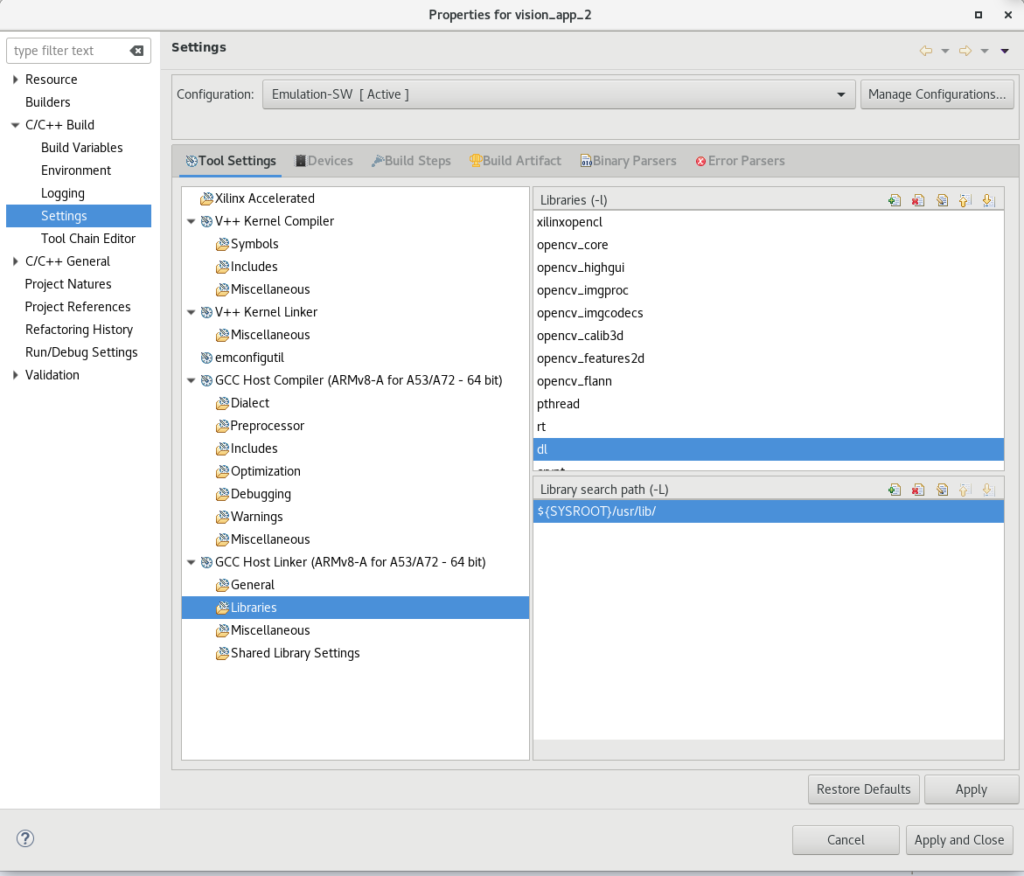
- Go to ‘GCC Host linker’-> ‘Libraries’ and under ‘Libraries(-l)’ add:
- opencv_core
- opencv_highgui
- opencv_imgproc
- opencv_imgcodecs
- opencv_calib3d
- opencv_features2d
- opencv_flann
- Click <app_project_name>.prj and under the Hardware functions tab click the ‘Add Binary Container’ button to create a binary container and the ‘Add Hardware Function.’ This should then open a window that lists ‘fast’ which we can then add to the binary container
- We should now be able to successfully build and run our project, but if we do so we will receive an error because we have not feed in the correct arguments or an image
Running FAST in Software Emulation

- First thing we need to provide is an image, which we shall call test_image.jpg
- If we use a high resolution photo, software emulation will take a very long time, instead we will be using a low resolution 200×200 photo
- We need to edit the parameters of our fast, so that it knows it is recieving a 200×200 image
- In ‘xf_config_parameters.h’, edit the width and height definitions to be both 200
- Place this image inside our application projects ‘src’ folder
- In the ‘Explorer’ window, click ‘Emulation-SW’->’_vimage’->’emulation’->’sd_card.manifest’
- In ‘sd_card.manifest’ add the following line:
<application_directory>/src/test_image.jpg
- We now need to provide the name of the image as an argument to the program by right clicking the application project ‘Run As’->’2 Launch on Emulator’
- The first run in the TCF Debug Process Terminal will fail:
ERROR: Cannot open image
- We need to supply the correct arguments, we can do this by running the program through the ‘Emulation Console’ window by supplying the following command:
./vitis_vision.exe ./test_image.jpg
- We should see the following output:
INFO: Running OpenCL section.
 Found Platform
 Platform Name: Xilinx
 INFO: Device found - xilinx:pcie-hw-em:7v3:1.0
 XCLBIN File Name: krnl_fast
 INFO: Importing ./binary_container_1.xclbin
 Loading: './binary_container_1.xclbin'
 ocvpoints:1189=
 INFO: Verification results:
     Common = 1189
     Success = 100
     Loss = 0
Gain = 0- We can also extract the output image, by going to ‘Xilinx’->’XCST Console’
- This should open a XCST Console window which we can use to transfer files. Open the link to the VM by typing in the console:
connect -url tcp:localhost:1440
- We can then transfer files using this console and the following command:
tfile copy -to-host /mnt/output_hls.png <host_directory>/ output_hls.png
- Which gives us the following image

- It may be difficult to see in this image due to its low resolution but for each corner found in the image a circle has been drawn around it. Now we have a sucessful software version we can try hardware emulation
Running in Hardware Emulation
- Now that we have it working in software emulation, we can run it in hardware emulation
- Go to the <app_name>.prj in the explorer tab and change ‘Active Build Configuration’ from ‘Emulation-SW’ to ‘Emulation-HW’
- Copy the ‘C/C++ Build Settings’ from software emulation to hardware emulation
- In the ‘Explorer’ window, go to ‘Emulation-HW ‘->’_vimage’->’emulation’->’sd_card.manifest’
- Edit ‘sd_card.manifest’ to include ‘test_image.jpg’
<workspace_directory>/src/test_image.jpg
- Right click our application project in the explorer window and click ‘Run As’-> ‘2 Launch on Emulator’
- In the next screen, restart and run the emulator. This should launch Vivado
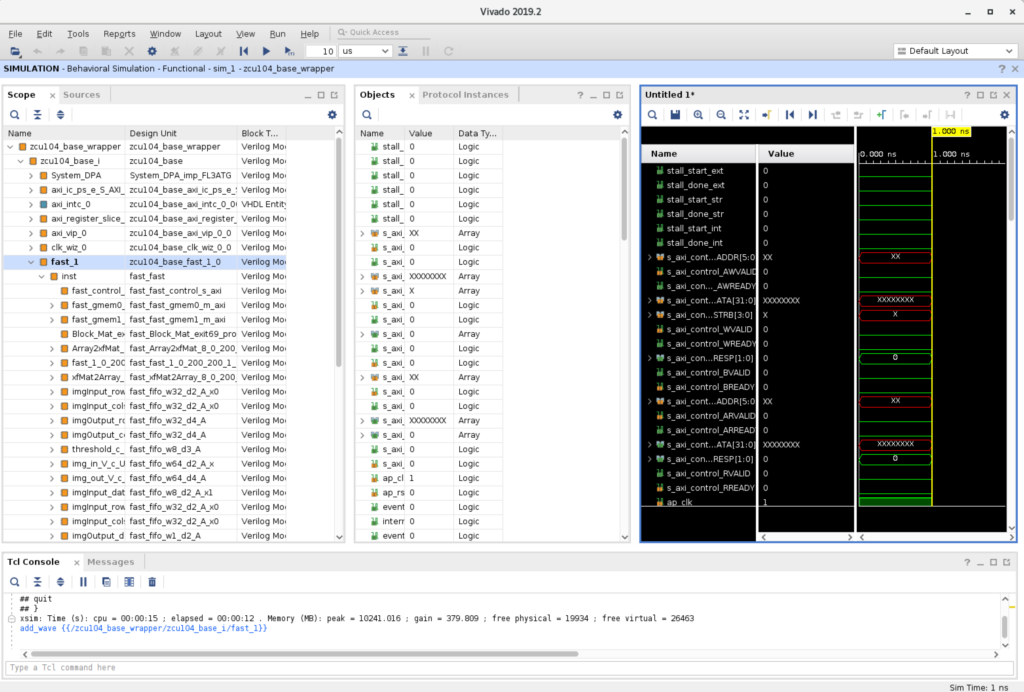
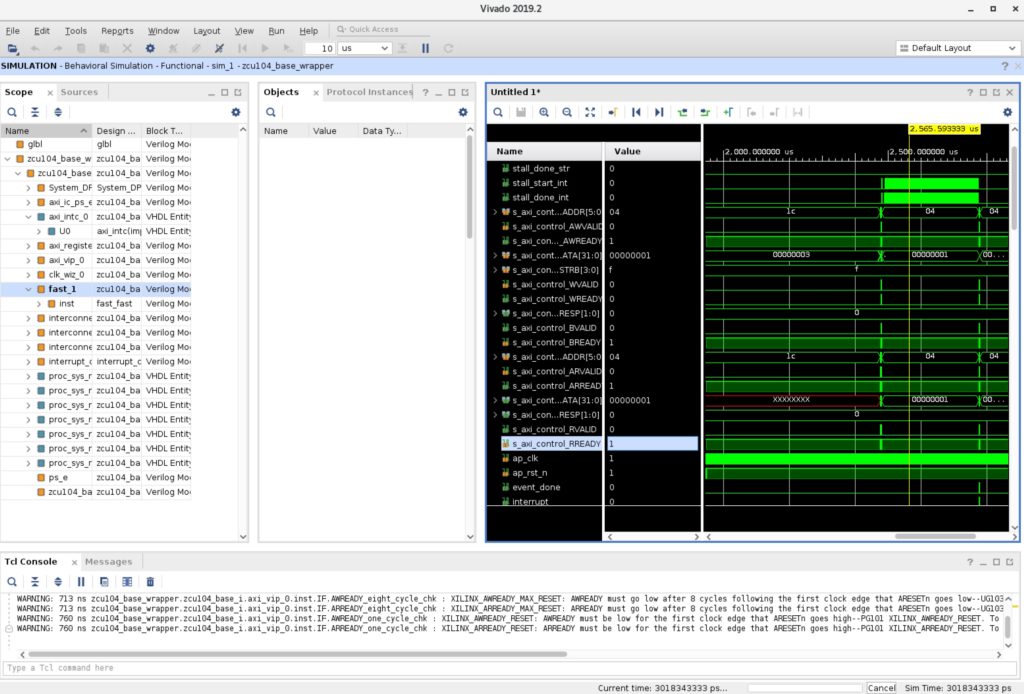
- In Vivado, in the ‘Scope’ window, navigate to the fast_1 module. Right click it then ‘Add to Wave Window.’ This should add the waves of the FAST module to the wave window as shown below
- In the tool tab, hit the ‘Run All’ button, this should begin to boot the emulator
- Back in Vitis we should get the familiar message from the output console:
ERROR: Cannot Open Image
- Just as in software emulation, in the ‘Emulation Console’ run:
./vitis_vision.exe ./test_image.jpg
- We should see the same output as before
INFO: Running OpenCL section.
 Found Platform
 Platform Name: Xilinx
 INFO: Device found - zcu104_base
 XCLBIN File Name: krnl_fast
 INFO: Importing ./binary_container_1.xclbin
 Loading: './binary_container_1.xclbin'
 ocvpoints:1189=
 INFO: Verification results:
     Common = 1189
     Success = 100
     Loss = 0
Gain = 0- With hardware emulation we can verify the functionality of our module through the waveform:
- We can also similarly repeat our previosu actions and extract the image to ensure it is working correctly
Hardware
- Now that we have it working in hw-emu, we can run it on our hardware
- Go to the <app_name>.prj in the explorer tab and change ‘Active Build Configuration’ from ‘ Emulation-HW ‘ to ‘Hardware’
- Copy the ‘C/C++ Build Settings’ from software emulation to hardware emulation
- Once that is complete, then build the project. Note this can take several hours to complete
- When the project has finished building, in our ‘Assistant’ window, under ‘Hardware,’ we should now have a ‘SD Card Image’
- To transfer files onto our Zynq, run the program and transfer the files off, we can run through the same steps that we did in Part 3. At the end of it we should get the same image that we got in software emulation
In this tutorial, we have managed to run a hardware accelerated kernel in the Vitis Vision library. These kernels will form the low level basis of any Computer Vision System we wish to develop. Looking at these kernels can also effectivly teach us how to to use Vivado HLS and develop our own vision modules to be accelerated on the FPGA, which we will be looking at next time!
Previous: Using OpenCV and File Transfers
Next: Accelerating Computer Vision using XRT and Kernels
If you have enjoyed this tutorial but are in current need of talent to build advanced Computer Vision systems on FPGAs, consider joining our ClickCV Early Access programme. ClickCV Early Access provides bespoke service and support for developing advanced Computer Vision systems on FPGAs. We use our own proprietary Computer Vision Library, ClickCV, to provide our clients the cutting edge in low latency, high definition processing. Contact us today to find out how we could build your next-generation system.
About the Author: Andrew Swirski is the founder and managing director of Beetlebox, a Computer Vision Acceleration specialist. The company develops the Computer Vision Acceleration library called ClickCV, which is designed to fully utilise the hardware adaptability and performance of FPGA chips. Beetlebox is currently running an Early Access programme, where the company provides bespoke service and support to develop client’s Computer Vision systems on FPGAs. Before Beetlebox, Andrew Swirski previously worked at Intel (formerly Altera) in FPGA encoding and decoding. He completed a Masters’ in Electrical and Electronic Engineering from Imperial College London in 2017.


For me this path does not exist
Emulation-SW’->’_vimage’->’emulation’->’sd_card.manifest’
Was this changed in 2020.1?
Can you help me here? I am unable to find a way to transfer my test image to the emulator.
I am using VITIS 2020.1
I tried using –package.sd_dir option in build settings but I presume I am adding them at the wrong place.
I was able to resolve this. So basically in 2020.1, we need to add the —package.sd_dir in the .sprj window. This directory can be used to pass input arguments to the emulator since it gets packaged with the sdcard image.
Also there are some modified steps to run the sw-emulator.
We need to source a few envt variables in the emulator: XILINX_XRT, XILINX_VITIS and XCL_EMULATION_MODE (set to sw_emu). Without these, the emulator will just hang.
The hw emulation runs as you have suggested here.
Hello,
Great tutorial series, thanks for sharing!
is there any plans to do the next post “Accelerating Computer Vision using XRT and Kernels”?
Hello,
Great tutorial series, thanks for sharing!
is there any plans to do the next post “Accelerating Computer Vision using XRT and Kernels”?