
Over at Beetlebox we are excited for the release of Vitis, which is the unification of all of Xilinx’s previous software into a single package. We have been working hard on computer vision using this platform and thought that we could provide some help to others wanting to get started on Xilinx’s development boards. This tutorial will be a multi-part series covering the basics of getting started with computer vision and Vitis and will be covering:
- Getting XRT and Linux up and running
- How to build “Hello World” and understanding Vitis Development Flow (Current Page)
- Using OpenCV on the embedded system
- Using Vitis Vision Library
- Accelerating Computer Vision using XRT and Kernels
We hope these tutorials will be useful for anyone looking to get into computer vision on FPGAs.
Part 2: How to build “Hello World” and understanding the Vitis Development Flow
The Vitis Development Flow
In our previous tutorial, we looked at building the platform project with Linux and XRT and then we built an example application project in hardware and ran it. Running through this process, it is hard not to notice that building the hardware was incredibly slow and that was just for a simple project.
Thankfully Vitis provides ways of emulating our application projects to increase the speed at which we can build and test them. The Vitis Development Flow involves moving from emulation to running on hardware. In this tutorial, we will explore all three methods:
Software Emulation
In software emulation, both the host and kernel code is compiled quickly to run on an x86 system. Running our application requires the use of Linux, so Vitis will use the Quick EMUlator (QEMU) to run a Linux system (more information can be found here) and our application will then run on this emulator. This is the best mode for basic application testing and debugging and should be as the starting point for an project.
Hardware Emulation
Hardware emulation runs the host code on a simulator as before, but the kernel code is compiled into RTL code and then runs on the Vivado simulator, providing a cycle accurate view of the kernel code. This is useful for checking if there are any differences between software and hardware functionality and also provides us with performance estimates for our kernel.
Hardware
Hardware mode provides us with the files we need to run the system on our embedded platform with the host code running on the ARM processors and the kernels being placed onto the FPGA fabric itself. This effectively creates the ‘release’ version of our system.
Instructions
Pre-requisites:
Our particular setup:
- Operating System: Ubuntu 18.04.02
- Development board tested: ZCU104
Making “Hello World”
To show the differences between the three build modes, we need code that contains both host and kernel code. Vitis provides us with an example program that performs vector addition, so we will use that. Let us begin with a new application program:
- Begin from the system project we created last tutorial
- File->New->Application Project
- In the ‘Create a New Application Project’ window:
- Project Name: hello_world_1
- Click ‘Next’
- In the ‘Platform’ window:
- Click the platform that we created in the previous tutorial
- Click ‘Next’
- In the ‘Domain’ window:
- Leave everything default
- Click ‘Next’
- In the ‘Templates’ window:
- Click ‘Vector Addition’
- Click ‘Finish’
- The ‘Vector Addition’ program consists of three files. ‘vadd.cpp’ and ‘vadd.h’ run on the Host, whilst ‘krnl_vadd.cpp’ runs on the FPGA fabric. Here is an excellent breakdown of how the ‘Vector Addition’ code functions
- To make this a true ‘Hello World’ example, in ‘vadd.cpp’ let’s add the following line just after the ‘int main(int argc, char* argv[]) {‘ line:
std::cout << "Hello World from Beetlebox"<< std::endl;
Software Emulation
Now that we have modified the code we need to ensure it is functionally correct:
- Name it “test” and click next
- In the 'Explorer' window, click the 'hello_world_1.prj'
- In the 'Application Project Settings,' make sure that 'Active build configuration' is set to 'Emulation-SW' as shown below
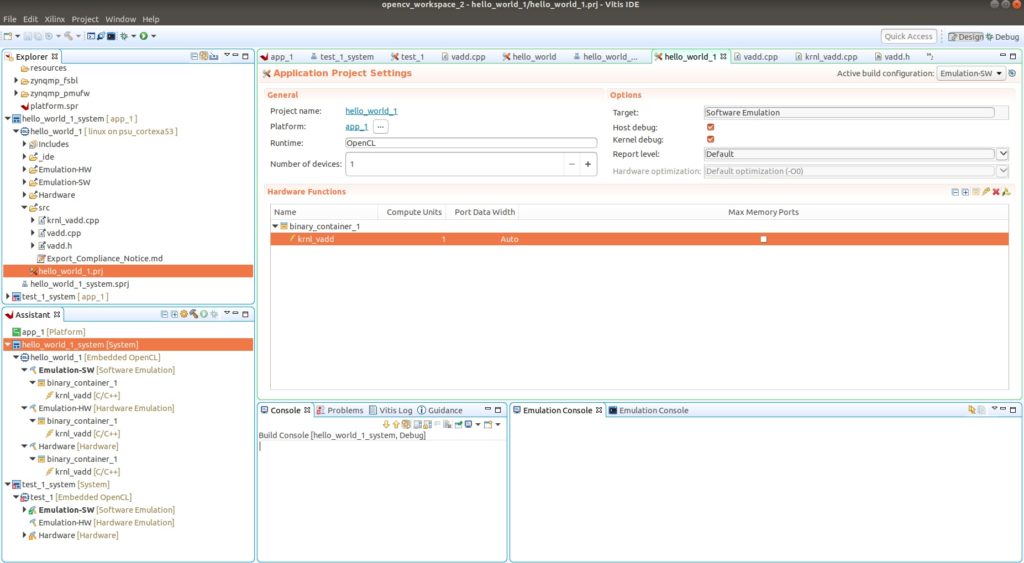
- Build the project
- Once it is built, it is time to debug it. Right Click on 'hello_world_1'->Run As-> 2 Launch on Emulator (Single Application Debug)
- A window should appear, click 'Start Emulator and Debug'
- This will launch the QEMU. A window should appear stating that Vitis is 'Waiting for the Linux TCF agent to start.' In the 'Emulation Console' window, we see Linux booting. Once this has finished (it can take awhile), the program will run
- In the 'Console' window that is titled 'TCF Debug Process Terminal', we get the following output:
Hello World from Beetlebox
Loading: './binary_container_1.xclbin'
TEST PASSED
- The 'Emulation Console' window should be running Linux and we can even rerun our program through the following commands:
cd /mnt
./app_1.exe binary_container_1.xclbin
- Finally, we need to end the emulation: 'Xilinx'->'Start/Stop Emulator'
- In the 'Emulation' window, hit 'Stop'
Hardware Emulation
Since our code now works in Software Emulation, we need to ensure that the hardware will have the same behaviour through Hardware Emulation.
- In the 'Explorer' window, click the 'hello_world_1.prj'
- In the 'Application Project Settings,' make sure that 'Active build configuration' is set to 'Emulation-HW'
- Hit build. This process will take far longer than software emulation as the kernels need to be synthesised
- Once built in the 'Explorer' window under 'hello_world_1': right click-> 'run as'->'run configurations...'
- This will open the 'Run Configurations' window. Set 'Configuration' to 'Emulation-HW' and then click 'Run'
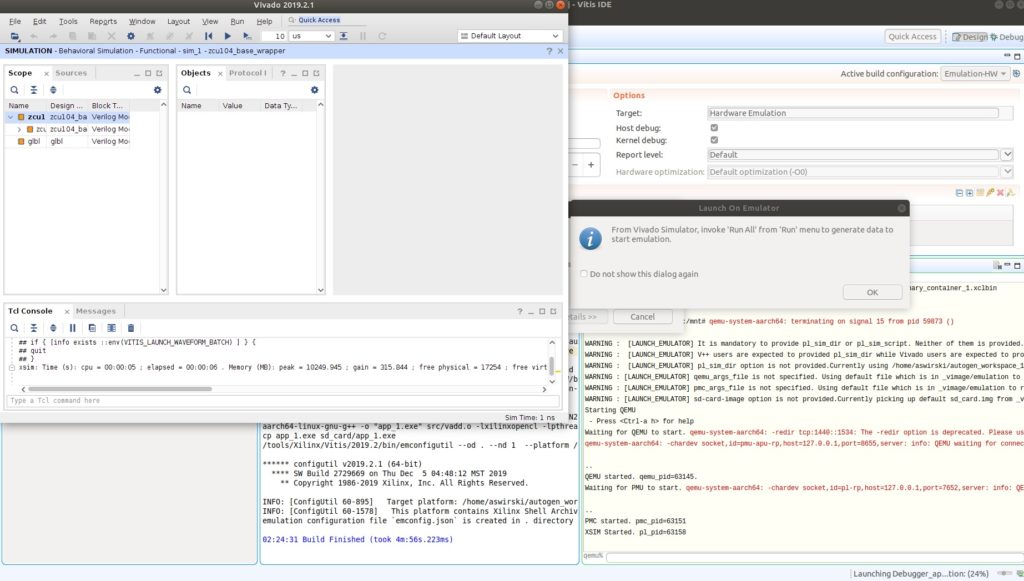
- This will open the 'Launch on Emulation' window, make sure the 'Launch Emulator in GUI mode to display waveforms' is ticked
- The Linux agent will begin to boot before Vivado pops up as shown below
- In Vivado, we need to choose what waveforms we wish to see. First click 'File'->'Simulation Waveform'->'New Configuration'
- In the 'Scope' window expand 'zcu104_base_i'
- Right Click on the waveform window and click 'New Group,' call this group 'VAdd'
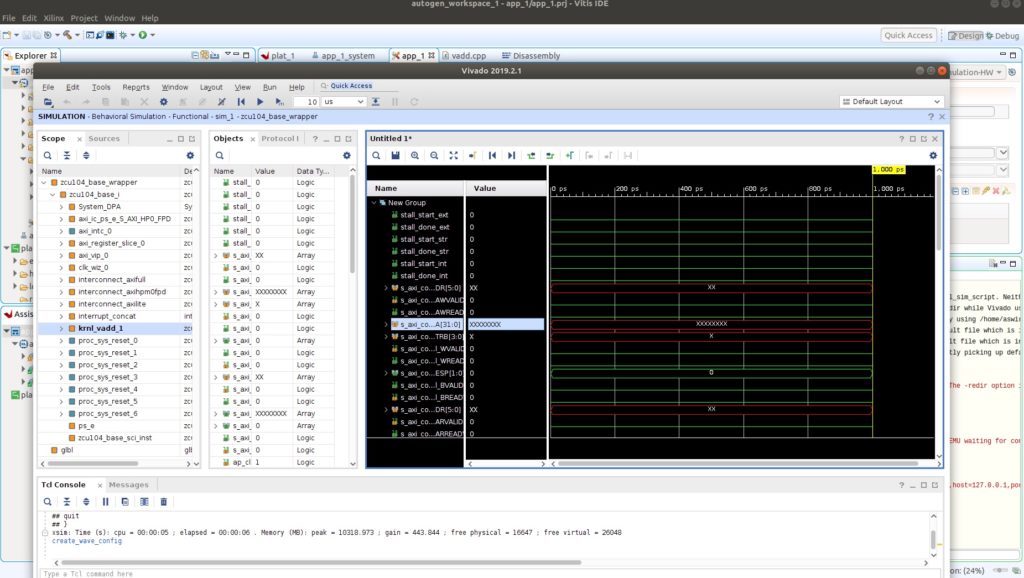
- Drag 'krnl_vadd_1' under the 'VAdd' group and then expand to get a view that looks like the following:
- In Vivado, click the 'Run All' button, this will resume the Linux boot sequence in Vitis
- Once Linux is done booting, the program should run and just like in Software Emulation, we should receive the following output from the console
Hello World from Beetlebox
Loading: './binary_container_1.xclbin'
TEST PASSED
- Looking back at Vivado, we should see a distinct area of activity where the kernel was active as shown in the picture below:
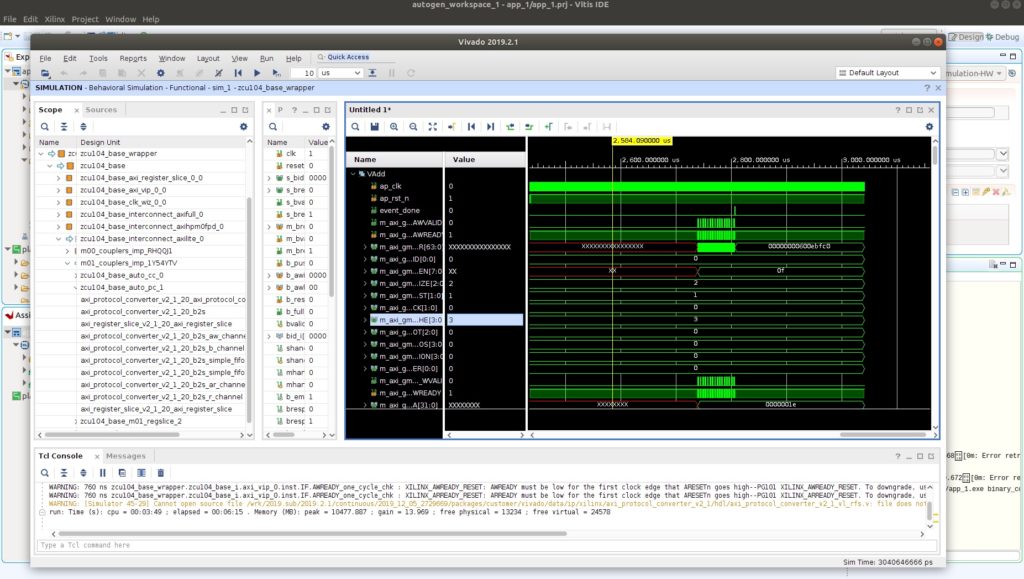
- We can now freely investigate the behaviour of our kernel on a cycle-accurate level and debug any troubles we may have done
- Once we are finished, hit 'Break' and exit Vivado. This will automatically stop the simulation
Hardware
Now that we have ensured correct functionality, it is finally time to deploy our program on hardware.
- In the 'Explorer' window, click the 'hello_world_1.prj'
- In the 'Application Project Settings,' make sure that 'Active build configuration' is set to 'Hardware'
- Hit build
- Once it has finished building, expand 'Hardware' under the 'Assistant' window.
- Right click 'SD card image'-> 'Open' -> 'Open in File Browser'
- Copy the contents of the SD card image on to a SD card
- Ensure the board is in 'SD card boot' mode
- In Vitis, go to 'Window'->'Show View' and search Terminal
- Select “Vitis Serial Terminal” and hit 'Open'
- Use the 'Plus' button on the top-right hand corner to connect to a serial port
- The COM terminal will differ depending on the board, but for the ZCU104 it is COM5. Make sure the Baud rate is '115200'.
- Click 'Ok'.
- Turn the board on and wait as the board boots
- Once it has finished run the following commands:
cd /mnt
./app_1.exe binary_container_1.xclbin
- If everything has gone to plan, we should receive the following:
Hello World from Beetlebox
Loading: './binary_container_1.xclbin'
TEST PASSED
Using a 'Hello World' example from Vitis, we have gone through the basic Vitis Development Flow process. Using this, we can now develop our own applications in a manner which is efficient to debug.
Previous: Getting XRT and PetaLinux working on Xilinx boards
Next: Running an OpenCV Application Program in Vitis
If you have enjoyed this tutorial but are in current need of talent to build advanced Computer Vision systems on FPGAs, consider joining our ClickCV Early Access programme. ClickCV Early Access provides bespoke service and support for developing advanced Computer Vision systems on FPGAs. We use our own proprietary Computer Vision Library, ClickCV, to provide our clients the cutting edge in low latency, high performance processing. Contact us today to find out how we could build your next-generation system.
About the Author: Andrew Swirski is the founder and managing director of Beetlebox, a Computer Vision Acceleration specialist. The company develops the Computer Vision Acceleration library called ClickCV, which is designed to fully utilise the hardware adaptability and performance of FPGA chips. Beetlebox is currently running an Early Access programme, where the company provides bespoke service and support to develop client’s Computer Vision systems on FPGAs. Before Beetlebox, Andrew Swirski previously worked at Intel (formerly Altera) in FPGA encoding and decoding. He completed a Masters’ in Electrical and Electronic Engineering from Imperial College London in 2017.
Excellent tutorial. Well written and documented with images.
Vitis is familiar to previous tools but different enough that lots of people are having difficulty making the jump. Thanks, Andrew, for helping us come up to speed with Vitis.
Eager to see the next tutorials in the series.
Bob
When will we get part 3? 🙂
Up now:
https://beetlebox.org/getting-started-with-computer-vision-for-vitis-embedded-systems-part-3-using-opencv-and-file-transfers/
Hi, I’m new at xilinx and Linux. Ans xilinx’s platform said that I’m need 18.04.04 but always upgrade to 18.04.05. How prepare I the Ubuntu tu install vitis.
Hi, I’m new at xilinx and Linux. Ans xilinx’s platform said that I’m need 18.04.04 but always upgrade to 18.04.05. How prepare I the Ubuntu tu install vitis.
When I run the Hardware Emulation, Vivado pops up and have an error:
“……/Emulation-HW/_vimage/rundir/behav_waveform/xsim/libdpi.so:undefined symbol:_ZTI14remoteport_tim
ERROR:[Simtcl 6-50]Simulation engine failed to start: Simulation exited with status code 127. Please see the TCL Console or the Messages for details”
And the simulation is failed.
Have you any solutions to fix it ?
Please help me ! Thank you very much !
Best Regards,
Dat Pt